Roasted Radishes with Miso Butter and a Giveaway

Roasted Radishes with Miso Butter

This is a little mini recipe and a weekend update to let you know what’s happening over on this here blog. Firstly, radishes.

Radishes are springy and pretty, but on their own they are maybe not so fun to eat (bitter? watery? yum?). While I was in Japan, however, I ingested a large amount of daikon, which is kind of a radish. Then I was thinking about other Japan flavors, so miso came to mind, and then the Frenchy combo of radishes with butter. Radishes with miso butter? Turns out, yeah. Frankly, it’s not even worthy of full-on recipe formatting because it’s too stupid easy. Just do this:

1. Get some radishes

2. Also get some butter and white miso paste

3. Mix two parts of butter to one part of miso (I went with Tablespoons)

4. Cut the tops off your radishes, slice them in halves or quarters, spread them on a baking sheet and throw on some blobs of miso butter. Roast at 400 until the radishes are browned and soft. Add pepper and taste, then add salt if it’s needed.

Now, about that giveaway…

My Salted Brown Butter Vanilla Bean Crispy Treats were featured on Buzzfeed (eee!!) which is a big deal for a little old blog like mine, so I’m being devious and trying to hook a few new readers with a Le Creuset cast iron skillet giveaway over on that post. Because I love my regular readers more than anything, I’d especially enjoy giving the fancy pan to one of you, so go and enter! All you have to do is leave a comment (over on my original post) and follow me on instagram (which many of you already do, so you’re half-way done). I post to instagram maybe weekly and mostly photos of food, so it should be pretty enjoyable for all involved.

cancel reply

Asparagus Carbonara

Asparagus Carbonara

When I got into food and cooking I sort of lamented the fact that I don’t have a really strong culinary heritage. Both my mom’s dad and my dad’s dad were Air Force pilots and my dad followed suit, so we are all, by necessity, not particularly sentimental or attached to any geographic locations or their accompanying cuisines. I was lucky enough to spend most of my childhood in Maryland, but my mom doesn’t like seafood, so I didn’t really absorb the food culture of the east coast either. Watching travel shows like No Reservations made me ache for that deep-rooted identity that surrounds the way real born and bred locals live and eat – it just seems so romantic to me, but I’ve more recently realized that roots come with strings (metaphorically speaking).

Italians, for example, hold their cuisine sacred. You slice your garlic, never grate it, pasta is a main, not a side, proper carbonara will not contain cream, etc. – the rules preserve the traditions, which I think is important, but it’s not for me. I dislike fettered-ness, which might have something to do with being a daughter of aviators (gravity, that’s cute). I like to think my lack of connection gives me an excuse for committing sins like this cream-drenched, American bacon-studded, asparagus-laden carbonara-esque, deliciously over-hyphenated pasta.

Asparagus Carbonara

I’ll leave it to others to preserve tradition.

Asparagus Carbonara

Asparagus Carbonara

Ingredients:
-1/2 pound long pasta (I used linguini fini, use what you want)
-at least 6 strips bacon, more isn’t a bad thing
-about 1/2 bunch of asparagus, snapped
-1 egg, plus 1 yolk
-1/4 cup cream
-1 clove garlic, grated
-1/3 to 1/2 cup parmesan cheese, grated
-salt to taste, and lots of black pepper

Method:

1. Start by roasting your bacon in a 325 F oven until the fat is well rendered and the bacon is brown and crispy (about 30 minutes), then crumble it and set it aside. Cook your asparagus (I blanched mine but roasting on the same pan as the bacon would be smarter) and slice it to your desired length.

2. In a large serving bowl (big enough to hold your pasta) whip together egg, yolk, cream, parmesan, garlic, salt, and pepper.

3. Boil pasta according to package directions for al dente. Don’t forget to salt the pasta water.

4. Working quickly, drain your pasta, dump it into the bowl with the egg/cream/cheese mixture, and cover the bowl with plastic wrap or a plate. Allow the hot pasta to sit in the sauce mixture for 3-4 minutes to cook the egg slightly and thicken the sauce.

5. Toss the pasta with the sauce and add the asparagus and crumbled bacon. Taste for seasoning and finish with more salt (if needed), more pepper, or more parmesan (or all three).

  1. My dad was Air Force, too (and a pilot!) so I totally get you on the food culture thing -- I've always felt like my food upbringing was pretty generic. I sometimes wished that I had grown up with a more definitive food identity, but have made my peace with it. I guess, in a way, I did have it - it's a military culture. A little bit of everything.

    April @ Girl Gone Gourmet — April 18, 2015
    1. reply
  2. Oh, my! This looks so delicious! Gonna make this for myself!

    Amy — April 19, 2015
    1. reply
cancel reply

The Stars of Spring

The Stars of Spring - Asparagus Some food combinations are assumed: bread and butter, peanut butter and jelly, flavors we know go together almost without thinking. Like fairy tales or fables, some things are so well-known you can call them up in your mind without ever having read or experienced them. Yet, there’s something about cracking open a copy of Aesop’s Fables or Grimm’s Fairy Tales that gives a bit more weight to the stories. Creating and eating these spring-centric, old-school food pairings was a similarly enlightening experience for me, so steeped in unfamiliar tradition that it almost felt like a ritual. It was pretty tasty too. So here’s how you conjure spring:

Go to the market and buy asparagus, eggs, lemon, and butter. Then blanche your asparagus and shock it in ice water. Make hollandaise (in a blender, I’m not a sadist) with your lemons, eggs, and butter. Line up a handful of asparagus, pour on the hollandaise, and eat them. If you need more accoutrements for a proper meal, I suggest bacon, english muffin, and a poached or fried egg (bam. asparagus benedict).

The Stars of Spring - Radishes

Or you could buy some fat radishes, fancy flaky sea salt, butter (bonus if it’s cultured), and a baguette. Slice and toast the baguette, let the butter come to room temperature, slice the radishes, slather the toast in butter, layer the radish slices, sprinkle with salt, and eat. You’ll find that while radishes on their own are bitter, radishes with butter are peppery and sweet.

The Stars of Spring - Strawberries

If you happen upon some pretty spring strawberries, grab them along with some heavy cream. Pour the cream on the berries and eat them. Resist the urge to add sugar. Probably slurp the cream when the berries are gone.

cancel reply

7 Spring Recipes to Help You Make the Most of the Season

scones with strawberries and cream

Spring, for me, is easily overshadowed by the more extreme seasons of the year – it’s temperatures are mellow, it’s holidays are not super festive, and it’s flavors can be sort of…mild. Baby greens are popping up, so salads are sort of obnoxiously ubiquitous and summer’s bolder dishes are still months away. I guess I need to be reminded what’s good about spring, apart from the weather. So I rustled up a few of my favorite springy recipes from this blog and others for some seasonal culinary inspiration.

My favorite, highly-adaptable scones, made simply with brown sugar, strawberries, and lots of whipped cream (pictured above).

virg burgers

May 17th is Memphis Belle day, which for me means one thing: Virg burgers.

Spring onions and baby potatoes are perfect for making my potato salad with grilled scallions and rustic romesco sauce.

Sauce Series in Practice - Grilled Scallion and Potato Salad with Rustic Romesco

One of my new favorite blogs transformed spring’s most abundant green leafy into a gorgeous and crave-worthy breakfast: creamed spinach toasts with fried eggs and fennel from The Pig & Quill.

I love asparagus, especially roasted, and even more especially with lemon – could go for a pan of The Food Charlatan’s lemon asparagus with pistachios right about now.

I’m pretty miffed I didn’t think of this one first: pickled strawberries (!) plus a pretty cocktail from Holly and Flora.

And to make the most of springy sweet peas: spaghetti with pancetta and peas from Girl Gone Gourmet.

Spring sprang sprung. Let’s enjoy it while we can.

  1. My mouth is watering. It all looks delicious!

    Lisa — April 7, 2015
    1. Thanks Lisa! I'm feeling the scones right about now myself.

      courtney — April 8, 2015
    2. reply
  2. I WANT TO EAT ALL THE THINGS

    hannah — April 8, 2015
    1. Thanks Hannah! I'm pretty pleased with what I dug up :)

      courtney — April 8, 2015
    2. reply
  3. THOSE VIRG BURGERS!!!! I'm so sad that I'm a Virg Burger virg! Might have to change that very, very soon. :) (Thanks for the link love, too, lady!)

    Em @ the pig & quill — April 8, 2015
    1. Thanks Em! Your blog rocks.

      courtney — April 8, 2015
    2. reply
  4. Thanks so much for the feature! All of the recipes sound amazing :)

    April @ Girl Gone Gourmet — April 8, 2015
    1. reply
cancel reply

Dill Pickle Hummus

Dill Pickle Hummus

This hummus happened by accident. I was browsing through Trader Joe’s, as one does, trying to look for snacks that are better for me than Doritos. I was also feeling lazy, so I picked up a tub of plain hummus, despite the fact that I’ve never found a store-bought tub that compares to my homemade version. I brought the stuff home, scooped it up with some crackers, and…boring (how shocking), some bell peppers: still boring. It needed acid and punch – so I decided to add some lemon and garlic. But I was out of lemons. My pickle jar stared at me suggestively, so I tried dunking a tart spear in the hummus, expecting the sesame and dill to probably hate each other, but they didn’t.

The plain hummus got scraped into the food processor with a clove of garlic and a splash of pickle juice, and it was really freaking good. I ate a lot of it and didn’t want Doritos at all. So, I decided to tweak and polish my homemade hummus recipe into a dill-pickle variation, and I’ve been snacking happily ever after. The end.

Dill Pickle Hummus

You can spike some store-bought hummus with pickle juice and garlic if you want for a semi-homemade hack (it will be an improvement) or you can make it from scratch, like this:

Dill Pickle Hummus
makes about 2 cups of hummus

Ingredients:
-1/3 cup tahini
-1-2 cloves garlic, chopped (two if they’re small or you really like garlic, one if they’re big or you’re shy)
-2 Tbsp lemon juice
-1/3 to 1/2 cup pickle juice (depending on how loose/pickle-y you want your hummus (I used fresh-packed pickles/juice like Claussen because they’re my favorite, you should use your favorite))
-1 15 oz can garbanzo beans, drained and rinsed
-1/4 cup dill pickles, chopped
-2 Tbsp fresh dill
-salt, to taste

Method:
1. In a food processor, combine tahini with lemon juice, garlic, and 1/4 cup of the pickle juice. Pulse everything together until the garlic is incorporated and the tahini is lightened in color and thickened (check out my smooth and fluffy hummus recipe for a photo of the texture you’re looking for). Scrape the sides and bottom of the food processor and pulse again until all of the tahini is smooth and homogenous.

2. Add about 1/3 of the garbanzo beans, all of the chopped pickles, and another tablespoon of pickle juice. Turn the food processor on and let it run until the garbanzo beans are fully blended and smooth.

3. Continue to add pickle juice (a tablespoon at a time) with garbanzo beans in two more batches, blending until smooth after each addition (about 30 seconds).

4. Add dill and pulse until the dill is well-incorporated. Taste the hummus and add salt. From here you can adjust the flavor and texture further with more pickle juice or salt. If you want a slightly looser/lighter texture but are happy with the level of pickle flavor, blend in a tablespoon or two of water. The hummus will thicken as it sits in the fridge, so if you intend to keep it for a few days I’d recommend making it quite a bit looser than your average store-bought version.

5. Serve with crackers, cucumbers, carrots, celery, or bell peppers. A splash of olive oil on top looks pretty but isn’t really necessary flavor-wise.

  1. Um...this is calling my name. I'm 35 weeks pregnant and totally fit the stereotype of craving pickles (but NOT with ice cream). This idea is GENIUS. Totally going in my belly asap. Thank you!

    Beth @ Eat Within Your Means — April 2, 2015
    1. Thanks Beth! I hope you love it!

      courtney — April 2, 2015
    2. reply
  2. Delicious recipe and gorgeous clicks! :)

    Anu-My Ginger Garlic Kitchen — April 10, 2015
    1. Thanks lady! Pickles and chickpeas for the win!

      courtney — April 12, 2015
    2. reply
  3. What a brilliant idea. I wonder how this would work with other pickled veggies? I've got some pickled tomatoes in the fridge that might work...

    Melinda @ RecipeFiction — April 10, 2015
    1. Thanks Melinda! Pickled tomatoes sound amazing. Let me know if you end up trying them in hummus!

      courtney — April 12, 2015
    2. reply
  4. Well, the best recipes happen by accident sometimes ;-) And this one is a winner!

    Suzy @ The Mediterranean Dish — April 10, 2015
    1. Thanks Suzy! Happy accidents are the best.

      courtney — April 12, 2015
    2. reply
  5. I made this today, really tasty! Thanks for the recipe, will definitely make again.

    Kristi — April 21, 2015
    1. reply
  6. Didn't want to throw out my pickle juice so I tried this. It came out great! Thank you for this creative idea!

    Joan — December 20, 2015
    1. reply
cancel reply

Japanese Fried Chicken Salad with Sesame Soy Dressing

Japanese Fried Chicken Salad with Sesame Soy Dressing

Sometimes I really want fried chicken for dinner. This puts me in a difficult position because I dislike frying intensely. Throttling the burner to keep the oil at the right temperature, resigning my forearms to grease splatters, and that fast-foody smell that lingers about 48 hours after dinner – by the time I’m done frying a batch of chicken I’m basically tapped-out. Sides tend to be an afterthought, but no woman can live on fried chicken alone. This salad is my favorite counterpoint to Japanese karaage-style fried chicken because it’s fresh and light and easy to throw together, not to mention delicious.

Japanese Fried Chicken Salad with Sesame Soy Dressing

Honestly, this salad can stand on it’s own, especially when it has that much avocado on top. If I weren’t in the mood for frying I would eat this by itself or maybe with a handful of toasted almonds, some grilled chicken, or maybe salmon on top.

The dressing is probably the biggest revelation though, because I always always have all the ingredients I need to put it together (except sesame seeds, but they’re more for looks than flavor here anyway). It’s literally a pantry dressing, and you can get as creative with the greens and add-ins as you like. Here I’ve used kale and romaine with cabbage, carrots, snap peas, and green onions, but I’ve served this dressing on a kale and cabbage slaw and a straight romaine salad and both worked well. Give your chicken a few hours to marinade and chop your salad before you start to fry. Then you can dress the salad and throw the karaage on top and you’re ready to eat.

Japanese Fried Chicken Salad with Sesame Soy Dressing

Japanese Fried Chicken Salad with Sesame Soy Dressing
serves 2-3

Ingredients:
1 recipe karaage (plan on about 1 breast or 2 thighs per person – don’t forget oil for frying and potato starch)

for the salad:
1 head romaine lettuce
4-5 leaves kale, chopped
1/4 small head red cabbage, shredded
1 carrot, peeled into ribbons
1/2 cup snap peas, sliced
3-4 green onions, sliced
1/2 avocado per person

for the dressing:
2 tsp toasted sesame seeds (plus another teaspoon or two to scatter on top)
1 Tbsp low sodium soy sauce
1 Tbsp rice vinegar
2 Tbsp neutral-flavored oil (I like peanut oil)
1/2 tsp toasted sesame oil
1/2 tsp honey
1/2 tsp sriracha
1 clove garlic, minced or grated

Method:
1. At least 4 hours and up to a day before, make the marinade for your karaage, pre-cut your chicken into strips, pour the marinade over the chicken and stash it in the fridge.

2. Before you begin frying, take your chicken out of the fridge to come up to room temperature. While it’s losing it’s chill, prep your salad and dressing. Wash your greens, peel your carrots, shred your cabbage, and slice the peas and onions – you can then pre-arrange the salads in your serving bowls or put everything together in a large salad bowl. In a smaller mixing bowl, whisk together sesame seeds, soy sauce, rice vinegar, neutral oil, sesame oil, honey, sriracha, and garlic and set it aside.

3. Preheat your frying oil in a deep-sided pot over medium heat. If you are using a thermometer to monitor the frying temperature, shoot for 350-375 (you may have to nudge the heat past medium to reach 350, but it’s better to undershoot and hit 350 slowly than overshoot and end up with a pot of smoking oil – be patient here, it’s worth it). Prep a landing spot for your chicken, like a cookie sheet in a warm oven or a cooling rack set over a tray. When your oil is hot enough, coat your marinated chicken in potato starch (dunk them one by one and roll them around until they are nicely covered – rubber gloves are great for this).

4. Fry your potato starch-coated chicken in small batches until the chicken is cooked through and the outside is nicely golden brown (the soy sauce marinade will cause some dark spots and the potato starch will fluff up and create some white bits, but that’s all good). Taste a piece of chicken to make sure it’s well-seasoned – if your marinade time was short, you will need to add a little salt.

5. Assemble your salads, top with dressing, slice your avocado, pile on the fried chicken, and finish with a final sprinkle of sesame seeds.

cancel reply

Breakfast Strata with Sausage, Spinach, and Gruyere

Breakfast Strata with Sausage, Spinach, and Gruyere

Bread pudding doesn’t have to be sweet, you know – and when it’s not, I think it sounds better as a strata (fancy name, basically the same thing). Pudding’s not such a great word to begin with, but “savory pudding”…no thanks. Breakfast strata? Don’t mind if I do.

Breakfast Strata with Sausage, Spinach, and Gruyere

We’ve covered all the basics of bread pudding construction in my last post, so all you really need to know for this one is: challah bread, hot breakfast sausage, spinach, onions, gruyere cheese, salt, and a pinch of nutmeg. It’s my favorite breakfast casserole that I’ve ever tried, and actually kind of handsome, for a pudding.

Breakfast Strata with Sausage, Spinach, and Gruyere

Breakfast Strata with Spinach, Sausage, and Gruyere

Ingredients:
-hot breakfast sausage (about a pound for a 9×9 casserole, two pounds for a 9×13)
-1-2 onions, sliced into longitudinal strips (every piece will be pretty even in size this way)
-a splash of white wine or apple cider vinegar
-spinach (about 2-3 cups fresh, 1 cup frozen)
-gruyere cheese, grated (about 3-4 cups, depending on the size of your casserole)
-challah bread, cubed (enough to fill whatever casserole dish you’re using)
-eggs (about 1 per cup and a half of cubed bread – eyeball it)
-half and half (1/2 cup per egg)
-nutmeg, a pinch – you want to just barely taste it
-salt

Method:

1. In a skillet set over medium heat, brown the sausage while breaking it up with a wooden spoon and set it aside.

2. In the same skillet that you used for the sausage, cook the onions in the left over fat until they are slightly browned. Season the onions with a pinch of salt and a splash of vinegar (cooked onions always taste a little better with a small splash of vinegar).

3. If you are using fresh spinach, add it to the pan with your onions to wilt, if you are using frozen spinach you can defrost it in the pan with the onions. Cook the spinach and onions until they are no longer releasing water, the onions are browned around the edges, and the spinach is soft and wilty. Season veggies to taste with salt.

4. Grate your gruyere cheese and cube your challah.

5. Butter your casserole dish and create a solid layer of challah in the bottom of the dish – really squeeze in a piece of bread wherever you can so the bottom is completely covered. Then add about 1/3 of your cheese, 2/3 of the sausage, and 2/3 of the spinach and onions, followed by another 1/3 of the cheese. Cover the sausage and veggies (more loosely this time) with the rest of the bread cubes. Top with the last of your sausage and vegetables.

6. Whip up your custard with one egg per cup and a half of bread (eyeball it – it’s easy to make a little more if you need to) and 1/2 cup of half and half per egg. (My small dish, filled to overflowing with bread, used about 4 eggs and 2 cups of half and half). Season the custard with 1/4 teaspoon of salt per egg, and a pinch of nutmeg.

7. Pour the custard over the assembled casserole, being sure to saturate all of the dry bread cubes that are sitting on the top. Use as much custard as is needed to saturate the bread and leave a liquid line about 1/2 way up the side of your casserole dish.

8. Top your casserole with the last of your cheese, cover with plastic wrap, and let it rest for at least 2 hours and up to overnight.

9. When it’s ready to bake, turn your oven to 325F. Remove the plastic wrap from the casserole and replace it with aluminum foil. Bake the casserole for at least 45 minutes covered, then uncover and bake for at least 15 minutes more, or until a knife inserted near the center of the casserole comes out clean. If you want a very brown and crispy top to your casserole, turn on the broiler for a minute or two (but keep an eye on it because cheese burns quickly). Allow the casserole to cool for about 10 minutes before serving.

  1. This was delicious! I was nervous about it because I've never made one of these before and I picked Easter Sunday, of course, to give it a try. I used 8 eggs and 4 cups of cream for my 13" x 9" pan, and baked it for 2 hours. Probably would have been done at 1.5 hours, but I wanted to make sure it was done. Everyone raved. Thanks for a great recipe!

    Judy H — April 5, 2015
    1. Judy I'm so glad the recipe worked for you! I tend to worry that my "adjustable" recipes are too different for people to comfortably use, but they're just more practical IMO. Did you use cream instead of half and half? I might have to try that myself - it sounds decadent in the best way. Thanks for returning and reporting!

      courtney — April 5, 2015
    2. reply
cancel reply

The Last Bread Pudding Recipe You'll Ever Need

The Last Bread Pudding Recipe You'll Ever Need

Last week we deconstructed french toast. This week I want to talk about bread pudding. Bread pudding is literally the casserole version of french toast, so for brevity’s sake I’m going to refer you that post for my reasoning on milk and custard ratios. Bread, on the other hand, behaves differently in casseroles and requires a bit of further discussion.

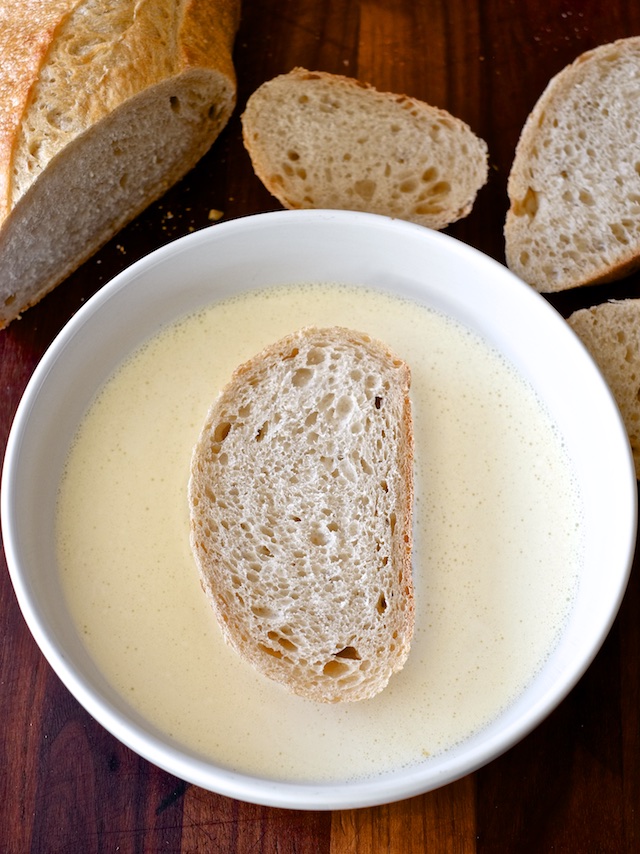
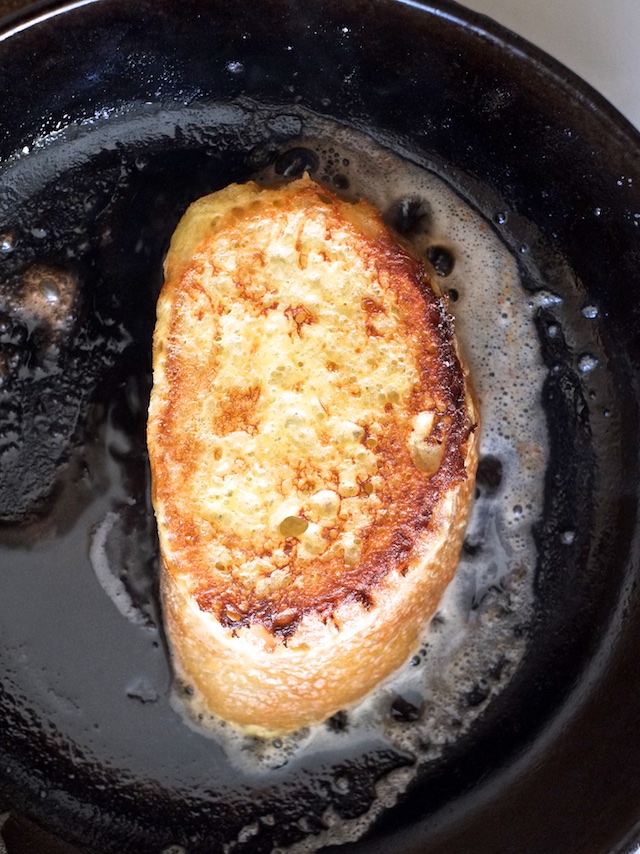
The Bread: Some people will probably disagree, but in my opinion, chewy/crusty bread works really well in french toast. The extra crispy surface area and relatively short soak time make for a rich french toast with good textural contrast. BUT chewy bread DOES NOT WORK in bread pudding. You get that crunchy top layer, yes, but the lower layer soaking in milk and egg turns the over-developed chewy bread gluten into paste. Chewy, gummy, sticky paste. It is UNPLEASANT. I highly recommend choosing a soft, delicate bread for bread budding – one that will practically melt into the custard.

The Custard: I like simplicity, and it turns out the ratio of egg to half and half used in our french toast works really well for bread pudding too. That’s one egg to 1/2 cup half and half. You can add sweetener for sweet versions of bread pudding, or salt and pepper for savory takes.

The Vessel: Go for something with straight vertical sides – round, oval, or square at the base doesn’t matter. The size is important though, because it will determine how many people you can serve, how much bread you need, and how much custard you need. You will need enough cubed bread to fill the casserole dish, and enough custard to saturate all the bread and fill the dish (meaning there will be an actual liquid level after saturating the bread) about half of the way up the side of the dish.

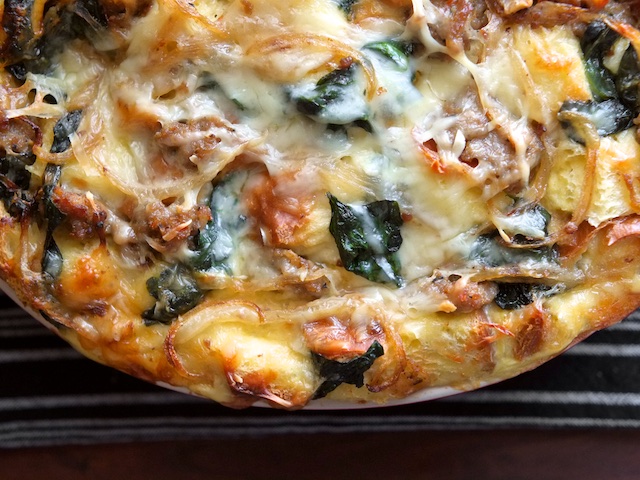
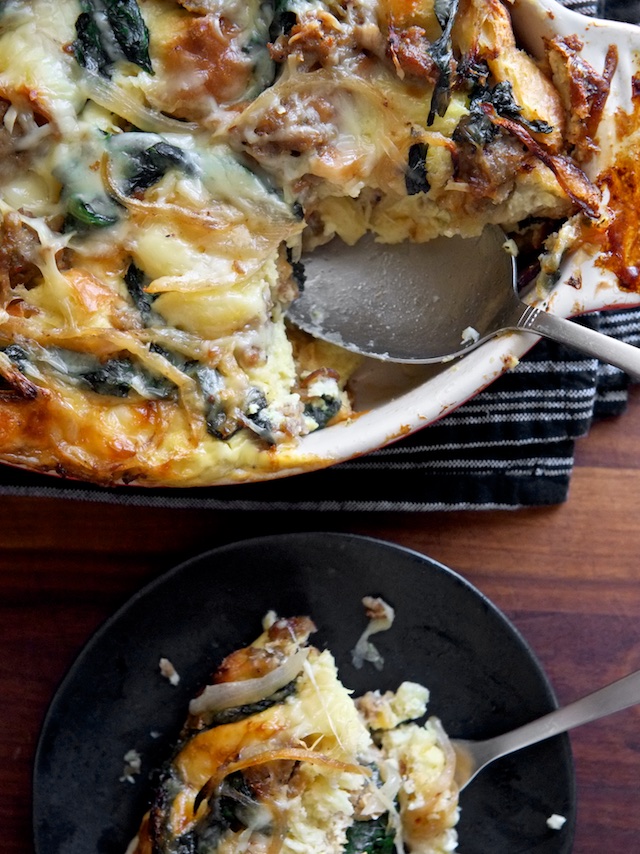
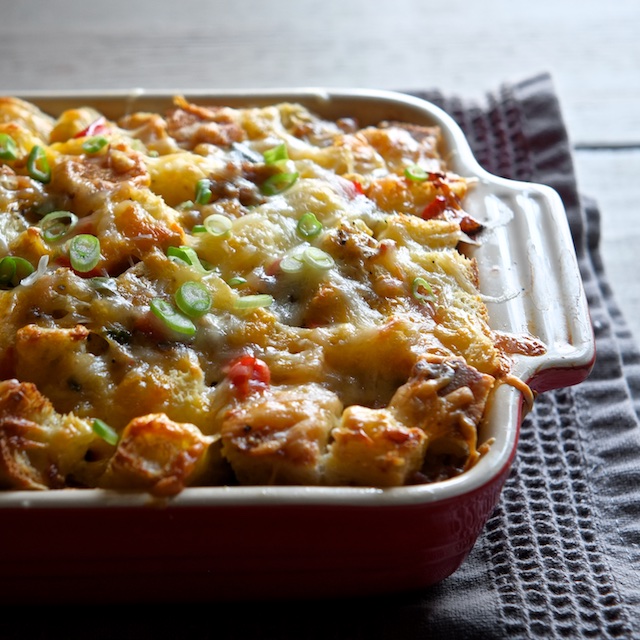
The Extras: Go with breakfast stuff for savory puddings: sausage, cheese, and veggies are my favorites. For sweet versions choose fruits, nuts, and even cheeses or chocolate. But really, use some additions, or you’re in for a boring meal. I also recommend pre-cooking anything raw to keep any water released from messing with the custard.

The Rest: Even more than french toast, bread pudding needs time to rest and evenly distribute the custard through the bread. I recommend a minimum of two hours, but overnight works best if you’re planning on serving bread pudding for breakfast.

The Cook: Low and slow in the oven is the best way to cook bread pudding, covered for the first 3/4 of the time, and uncovered at the end to crisp the top (with an optional finish under the broiler for extra browning). The exact time will depend on the size and depth of the dish you use, but plan on at least an hour of bake time at 325F. The best way to tell when the casserole is done is to insert a knife near the center of the pudding, when the knife comes out clean, the pudding is done.


The Last Bread Pudding Recipe You’ll Ever Need

Ingredients:
-soft bread, cubed (like challah or white bread, enough to fill your casserole dish)
-eggs (about one per cup and a half of cubed bread – eyeball it)
-half and half (1/2 cup per egg)
-flavoring for custard (about 1 Tbsp sugar per egg for sweet (plus a pinch of salt), 1/4 tsp. salt per egg for savory)
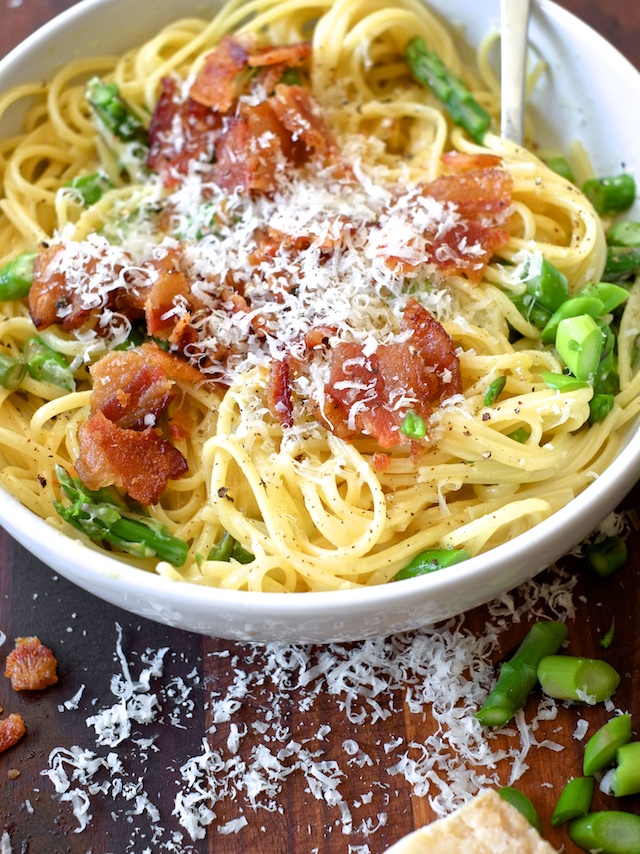
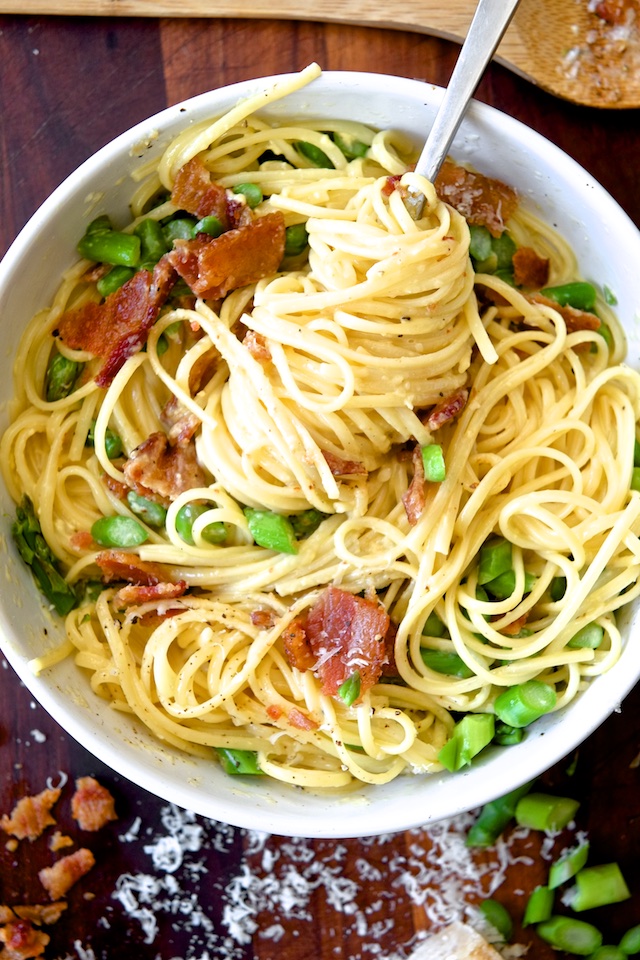
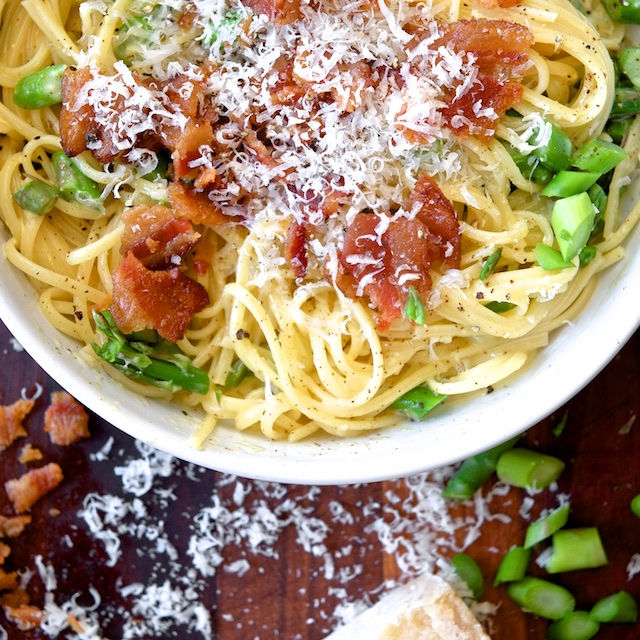
-extras (fruit, nuts, chocolate etc. for sweet, sausage, bacon, cheese for savory (amount not important as long as it all fits in your casserole dish))
-butter, for the casserole dish

Method:
1. Cook your extras if necessary and set them aside to cool.

2. Butter your casserole dish and cube your bread.

3. Fit a solid single layer of bread cubes in the bottom of your casserole dish, then layer in filling, cover with more bread and top with a little bit more of the filling (so people know what’s in it).

4. Mix up your custard using a blender or a whisk, and add sugar or salt and any optional spices.

5. Pour your custard over your assembled casserole, being careful to saturate all the bread cubes at the top of the casserole, and make enough that the dish is about 1/2 full of custard (much of which will be absorbed while it rests).

6. Cover the unbaked casserole tightly with plastic wrap and let it rest in the fridge for at least two hours and up to overnight.

7. Remove plastic wrap from casserole, replace with foil, and bake in a 325F oven for at least 45 minutes. Then uncover the casserole and bake at least 15 minutes more, or until the custard is set and a knife inserted in the center comes out clean. Let the bread pudding rest for about 10 minutes before serving.

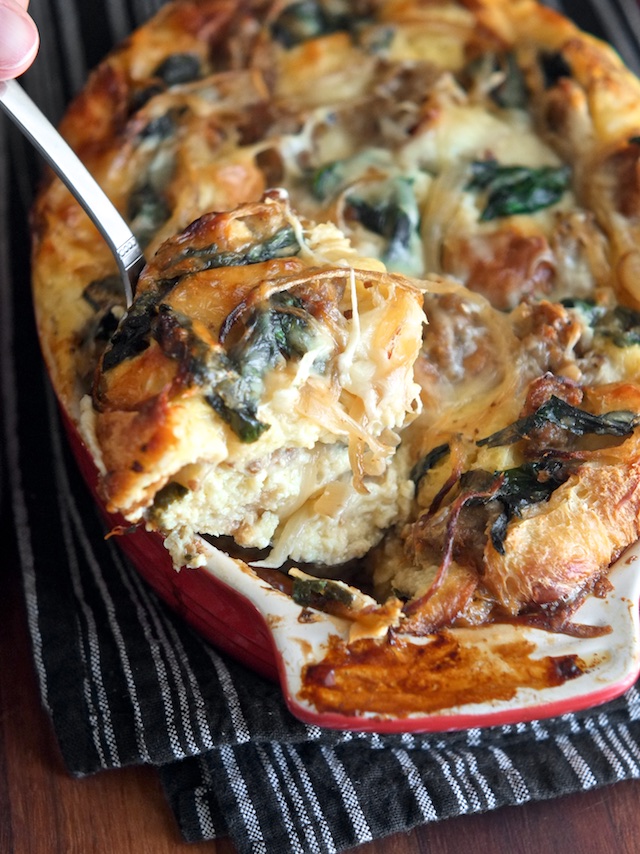
*The photo on this post is a savory bread pudding with cheddar cheese, breakfast sausage, bell pepper, jalapeño, onion, and green onion on top. I cooked the bell pepper, jalapeño, onion, and sausage beforehand, layered it up with cheese and bread, poured on the custard, and baked it. Easy.
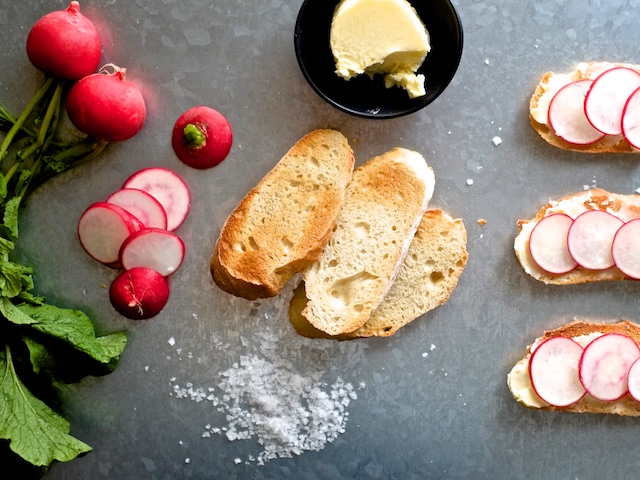
  1. […] The Last Bread Pudding Recipe You’ll Ever Need. Did you know that most breakfast casseroles are just bread pudding in disguise (frequently named […]

    Six Make-Ahead Recipes for Christmas Morning | Sweet Salty Tart — December 23, 2015
    1. reply
  2. […] and method on The Kitchn. Amidst my page of notes from various sites, I used the baking time from Sweet Salty Tart. (She suggests baking the bread pudding 3/4 of the time covered, 1/4 of the time uncovered.) It […]

    Gluten-Free Pumpkin Bread Pudding - MI Gluten Free Gal — December 2, 2016
    1. reply
cancel reply

Croissant French Toast

Croissant French Toast

So, Cody loves french toast. A few weekends ago I wanted to get out of the house and see a matinee, but Cody was on teenager time and resisted my attempts to get him moving before noon. I decided to do something he couldn’t ignore: make french toast. BUT all I had to work with bread-wise was a stale croissant. Resourceful girl that I am, I dunked said croissant in custard, fried it in butter, and presented it. To use the man’s own words, “this is better than regular french toast, but there should be more of it.”

The delicate custard I talked about in my “last french toast recipe you’ll ever need” post is great for this, but pay attention to the soak time if you want your croissant to retain some crispness – a short soak is all this delicate pastry needs. Rest time is also mandatory, or you will absolutely end up with scrambled egg pockets. Do it right, and you will be rewarded with the lightest, crispiest french toast possible.

Croissant French Toast

If you read my last post, you wont need a recipe to make this, but for those of you who didn’t, I’m happy to spell it out.

Croissant French Toast

Ingredients:
-croissants, at least one per person
-1 egg for every two croissants
-1/2 cup half and half per egg
-1/4 tsp cinnamon per egg
-1 tsp honey per egg
-butter, for cooking
-maple syrup, powdered sugar, and fruit for serving

Method:
1. Split croissants in half and set aside.

2. Make custard by blending egg, half and half, cinnamon, and honey.

3. Soak croissant halves cut side down for 15 seconds, then flip and soak for another 15 seconds.

4. Set soaked croissants on a paper-towel lined baking tray for at least 1 minute to let the custard disperse through the croissant and the excess drain away.

5. If you’re serving a couple of people, set a pan over medium-low heat and cook the croissants in butter until nicely browned on both sides and the custard is set (about 2 minutes per side). If you are serving a crowd, turn the pan to medium-high and brown the croissants on both sides, but don’t worry about setting the custard. When the croissants are brown, line them up on a baking tray and put them in a 300F oven for 5-10 minutes to finish cooking through.

6. Top with powdered sugar or maple syrup (or both) and serve with fruit.

  1. This looks FANTASTIC! I can't wait to try it.

    Erin @ Lemon Sugar — March 31, 2015
    1. Thanks Erin! Let me know how it goes when you do!

      courtney — March 31, 2015
    2. reply
  2. I made some croissants a while back and think they're too stale at this point so this looks like a perfect way to re-purpose them! Thanks!

    Scott — April 1, 2015
    1. Hi Scott! I'm impressed that you made your own croissants. I've still not ventured into the realm of laminated dough, so nice work! And yes, stale croissants are perfect for this, they might need a touch more soak time though. I hope you like it!

      courtney — April 1, 2015
    2. reply
cancel reply

The Last French Toast Recipe You'll Ever Need

The Last French Toast Recipe You'll Ever Need

Understanding french toast begins with deconstruction and ends with deeeliciousness? (So lame, I’m sorry.) I really believe that the better you understand a food the easier it is to riff and cook it on the fly. So let’s break it down, put it back together, and drown it in syrup.

The Milk: I like half and half – it’s fatty enough to give the french toast a delicate richness and thin enough to give the custard good soaking abilities. Whole milk is ok, 2% can work if you’re desperate, but if you’re serious about french toast, use half and half.

The Ratio: I’m talking about how much half and half you use per egg. And I like to use a ratio here because it gives you the flexibility to make a few slices or a huge batch without too much fancy math. You want custard that’s rich yet delicate – a balance achieved with the ratio of one egg per half a cup of half and half.

The Bread: Lots of recipes recommend challah or brioche, and those are good, but I also adore sourdough and chewy breads with crisp crusts. Definitely slice the bread at least 3/4 inch thick, and up to an inch. Technically, you can french toast any bread you want with a little finesse…

The Soak: The bread you use will dictate the length of time it needs to soak. Light and delicate breads like white bread or croissants (yesss, you can french toast croissants) call for a shorter soak: like 15-20 seconds per side. Dense and chewy breads will need more time: as much as a minute per side. Properly soaked toast will have taken on some liquid weight, but won’t be falling apart when you try to move them out of the custard.

The Rest: I get that sometimes you’re in too big of a hurry to really let the french toast rest between the soak and the pan, but a short time between steps will really improve the texture of the final product, by allowing the bread to distribute the custard evenly through the center of the bread and shed any excess. If you use a bread with a large hole-structure do NOT skip this step, unless you like the idea of thick scrambled egg pockets in your lovely delicate french toast.

The Last French Toast Recipe You'll Ever Need

The Flavoring: If you’re making sweet french toast, (which you usually will be) I recommend adding a little sugar or honey to the custard for both flavor and extra-brown crispy caramelization in the pan. Cinnamon is classic, but you can get really creative here if you want – vanilla bean, nutmeg, black pepper – or take it savory with minced garlic or hot sauce (omitting the sweetener, obviously).

The Fat: Butter, always. The end.

The Cook: Go with a cast iron or nonstick pan on medium-low heat for about 2-3 minutes per side to set the custard and brown the outside (more if your toast is very thick). If you’re serving a group, bump up the heat to medium-high and focus on browning the toast. Worry less about setting the custard because you’ll be employing the oven to cook the toast through. After your batch is browned, place the french toast on a baking sheet and put it in a low, 300F oven for 10 minutes.

Now let’s put it together.

The Last French Toast Recipe You'll Ever Need

The Last French Toast Recipe You’ll Ever Need

Ingredients:
-your favorite french-toasting bread, sliced 3/4 to 1 inch thick.
-eggs, about one for every 3-4 slices of toast
-half and half, one half cup per egg
-1/8 tsp salt per egg
-1 tsp sugar or honey per egg (if making sweet french toast)
-butter, for cooking (keep a stick at the ready to re-load between slices)
-optional spices and herbs (for cinnamon, use about 1/4 tsp per egg)

Method:
1. Slice bread to desired thickness and set aside.

2. Make custard by whipping together eggs, half and half, salt, and sugar or any flavoring you’re using. I like to use a blender for perfectly smooth custard, but a whisk will do. Pour the custard into a wide bowl or pie tin.

3. Soak bread between 15 seconds and 1 minute per side, depending on the type of bread. Delicate breads should be soaked 15-20 seconds. Denser breads can need up to a minute per side.

4. Set the bread on a paper towel-lined baking sheet or plate and let it rest for at least a minute.

5. If you’re making a few slices, heat your pan to medium-low, add a tablespoon or two of butter, and cook your french toast 2-3 minutes per side or until the outside is satisfactorily brown and the custard is set in the middle (you may need more time per side if your toast is very thick and dense) and serve. If you’re making a big batch, set the pan to medium-high, add butter, brown the french toast on both sides, and place on a baking sheet. When all the toast is browned, line it up on the baking sheet and put it in a 300F oven for 10 minutes and serve.

  1. Awesome tips - especially the 'finish it in the oven' one. French toast for a crowd always seems intimidating, but using the oven to finish/hold the batches would make it so much easier.

    April @ Girl Gone Gourmet — March 19, 2015
    1. Thanks April! Timing is one of those things most people don't think about and most recipes don't mention, but it's probably the trickiest thing about cooking in my opinion, especially when you're feeding a crowd!

      courtney — March 24, 2015
    2. reply
  2. […] To read more tips on perfect french toast, visit sweetsaltytart.com.  […]

    Perfect French Toast | It's Penelope's Place — May 4, 2015
    1. reply
cancel reply