Toasted Nut and Brown Sugar-Topped Sweet Potato Casserole

Toasted Nut and Brown Sugar Topped Sweet Potato Casserole

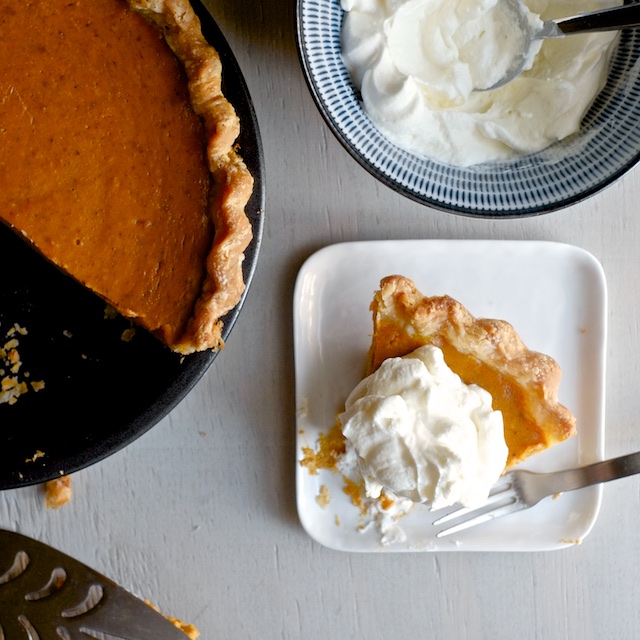
These are the sweet potatoes I made last year in Tanegashima for the NASA crew’s makeshift Japanese Thanksgiving dinner. They were well received – I even had a few guys come up and ask me for the recipe, which didn’t actually exist until now.

Toasted Nut and Brown Sugar Topped Sweet Potato Casserole

Ok, these are almost the sweet potatoes I made in Tanegashima. The missing ingredient is Japanese cooking equipment. When I made these last year, I finished them by blasting them under a high-powered broiler, since there was no oven in the hotel kitchen where we cooked. That Japanese broiler, with angry blue flames, turned the sugar topping into a crackly browned sheet of candy atop the fluffy sweet potatoes. They were delicious.

Toasted Nut and Brown Sugar Topped Sweet Potato Casserole

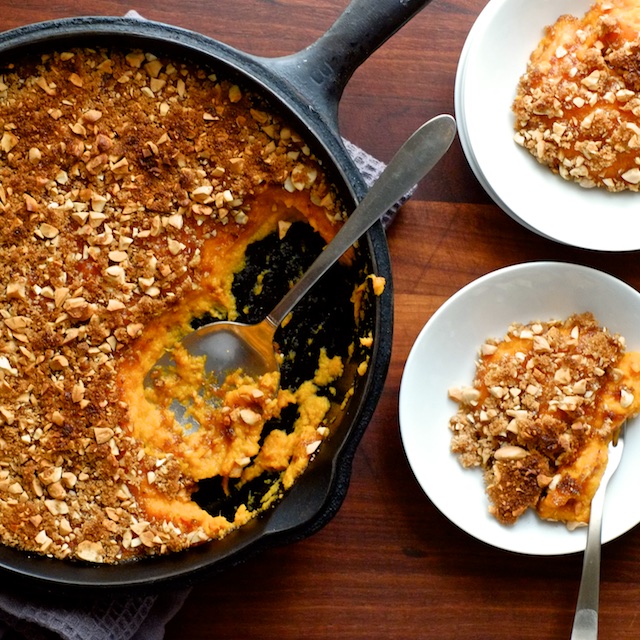
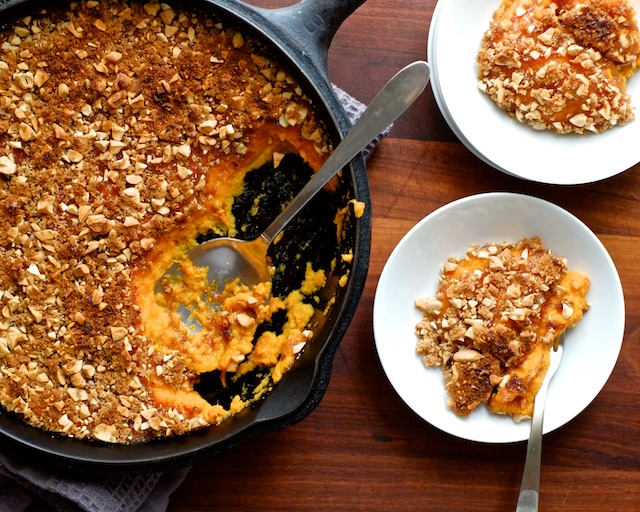
And truthfully, these are delicious too, but my weak-sauce American oven-broiler just can’t pull off a proper brulée. Still, this sugar topping is nutty and crunchy and it makes sweet and satisfying Thanksgiving yams just a little more interesting. So in the off chance you were looking for a new sweet potato recipe to round out your Thanksgiving table, here you are.

Toasted Nut and Brown Sugar Topped Sweet Potato Casserole

Toasted Nut and Brown Sugar-Topped Sweet Potato Casserole

Ingredients:
-3-4 large sweet potatoes (about 3 pounds total)
-4 Tbsp butter
-1/2 cup half and half
-salt
-1/2 cup toasted nuts (you can use your favorite – I like almonds and cashews)
-1/2 cup brown sugar
-1 tsp cinnamon
-1/2 tsp nutmeg

Method:
1. Roast potatoes whole, straight on the oven rack at 350F until they are tender. Like, pierce with a knife and the knife meets no resistance whatsoever – which will take at least an hour. I recommend lining the bottom of your oven with foil to catch the sugary juice that inevitably drips out of the potatoes.
2. Allow the potatoes to cool just enough for you to handle them. Split the potatoes and scoop the flesh out of their skins and put them in a mixing bowl. Add butter and half and half with a pinch of salt and stir together with the potatoes until they are smooth and everything is incorporated. Taste them – they should be buttery and sweet with just a hint of salt. Resist the urge to add sugar to the potatoes themselves, because the sugar topping brings a lot of sweetness already and the irregular mix of crunchy-sweet top with buttery, delicately-sweet potatoes is what makes this good.
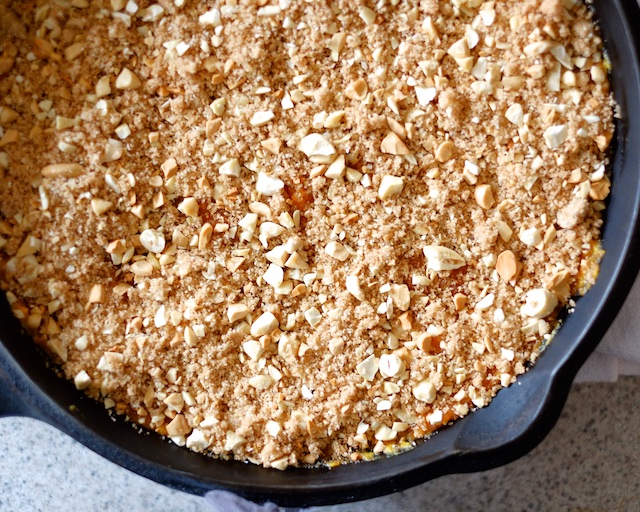
3. Toast whatever nuts you’ve decided to use (unless you bought them pre-roasted) and chop them up. Put them in a small mixing bowl and add the brown sugar, cinnamon, nutmeg, and another pinch of salt. Taste this mix – it should be sweet and nutty with just enough salt to bring out the richness of the toasted nuts.
4. Spread the potato mix in an oven-safe casserole dish and top with the toasted nut and sugar mix.
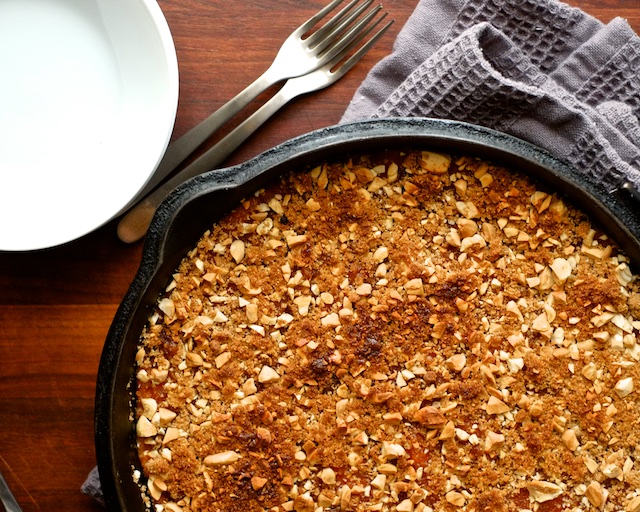
5. Turn on your oven’s broiler and adjust your top rack as close to the heating element as possible. Broil your casserole until the sugar is browned and crispy, and serve it up. If you can achieve full-brulée status, you have my respect. A kitchen torch would be really helpful here. And that’s what I’m asking for this Christmas.


  1. This looks amazing - what a perfect holiday meal side!!

    Millie | Add A Little — December 4, 2014
    1. Thanks Millie!

      courtney — December 4, 2014
    2. reply
cancel reply

One-Pot Orzo With Roasted Brussels Sprouts, Bacon, and Gruyere

one pot orzotto with roasted brussels sprouts bacon and gruyere

Can I still call it one-pot pasta if the brussels sprouts are roasted in the oven? It’s more like one-pot plus a pan pasta, but if you line your roasting pan with foil, you might not have to wash it after (I mean unless the foil tore, why would you?). And brussels sprouts are at their very best when roasted, so I think it’s worth another pan.

This recipe was actually born of disaster, but ended up being delicious. I set out to make one-pot orecchiette with brussels sprouts and bacon and gruyere, but orecchiette turned out to be the absolute worst thing to try to one-pot, beeeecause…

orzotto 1

Those adorable “little ear” shaped pastas like to NEST and stick together in the absolute worst way. I sat there jabbing at the pot for five minutes trying to get them all to break up, then desperately fished out all the offending stacks to pry them apart with my fingers, to no avail. The worst part is that when these things stick together they double, triple, quadruple their thickness, so they stay totally raw and chewy while the rest of your pasta turns to mush. Could I have avoided this by un-stacking them and dropping each little piece of pasta into the water one by one? Maybe, but it’s not a process I can suggest to fellow humans. So one-pot pasta makers, stay the heck away from orecchiette.

I settled on orzo because it was what I had in my pantry when the orecchiette failed me, and I actually like how it turned out. The shape of the pasta made a really thick sauce that only got richer with the addition of gruyere, and the bacon and brussels sprouts added their respective hits of salt and sweet. It’s a risotto-esque, belly-filling pasta that’s making this terribly cold fall a little easier for me to deal with.

one pot orzotto with roasted brussels sprouts bacon and gruyere

One-Pot Orzo with Roasted Brussels Sprouts, Bacon, and Gruyere

Ingredients:
-a few tablespoons of olive oil
-salt
-about 2 pounds fresh brussels sprouts, halved
-5-6 strips of thick-cut bacon (or about 10 strips of regular-cut bacon)
-1 medium onion, diced
-2 cloves garlic, minced or grated
-1 pound box orzo pasta
-1 quart (4 cups) water, plus another standby cup of water
-2 cups gruyere cheese, grated

Method:
1. Start by roasting your brussels sprouts. I like to cut off any brown stem ends, take off a few outer leaves, and just slice them in half vertically. Pile them up on your foil-lined baking sheet, drizzle on a few tablespoons of olive oil, a good pinch of salt, and toss them together to get them well coated and seasoned. Roast, cut side down, in a 400F oven for about 30 minutes.
2. In a large pot, cook your bacon over medium-low heat until it’s crispy and a lot of fat has rendered out. Remove the bacon to a paper-towel lined plate.
3. Sauté your onion and garlic over medium heat in some of the remaining bacon fat (take out as much fat as you like with a spoon or small ladle).
4. Drop your orzo into the pot along with your quart of water and a big pinch of salt. Increase heat until your water boils and stir the orzo periodically to keep it from sticking.
5. When the orzo is al dente, there should still be a good bit of saucy pasta water in the pot. If the liquid looks too thick. add more water. Turn off the heat and stir in your gruyere cheese. Taste the pasta for salt and add more if necessary.
6. Stir the brussels sprouts into the finished orzo and top with bacon and (optional) black pepper.

cancel reply

The Lazy Cook's Guide to One-Pot Pasta, Featuring: Cacio e Pepe

Hacking One Pot Pasta

That one-pot pasta…so hot right now. Martha’s doing it, Southern Living is doing it, all the bloggers are doing it, and now I’m doing it. For good reason! One-pot pasta is fast and simple and making it dirties minimal dishes, so everyone wins.

Hacking One Pot Pasta

The first time I heard about one-pot pasta it reminded me of something I saw Rachel Ray do (say what you want about RR, she was an early influencer in my n00b kitchen) back in 2007. She broke up pasta and added broth a little at a time, while she stirred, until the pasta cooked through. It was kind of like risotto-ing the pasta rather than boiling it in a steaming cauldron of salt water. Then I realized that I’d seen a more accurate one-pot pasta parallel even before 2007, on the back of a red cardboard box with an anthropomorphized hand in the corner, telling me how to brown ground beef. That’s right. One-pot pasta is really just jazzed up, deconstructed, hipster Hamburger Helper.

Hacking One Pot Pasta

Hey, a good idea is a good idea. But what kind of cred can a cartoon glove man command in the face of an Italian grandma with generations of kitchen wisdom to back her up? If I’d just listened to that weird old hand-with-a-face, I could have saved myself a lot of gallons of pasta water and all the BTU’s required to heat them. So as a cheeky tribute to my late realization, I one-pot pasta’d an Italian classic: cacio e pepe.

Cacio e pepe (Italian for cheese and pepper) is the perfect recipe to help us understand one-pot pasta because its about as stripped-down as a recipe can possibly get. The ingredient list is four items long, so all we’re really worrying about is a pasta:liquid ratio and the task of stirring until the pasta is al dente. Once you get the ratio and the method, you can one-pot pasta any noodle you want, with any flavoring you fancy. Such power is heady, no?

Hacking One Pot Pasta

What’s probably the coolest thing about one-pot pasta is the cooking water it produces. If you make pasta with any regularity, you’ve probably heard the old trick of adding a scoop of starchy pasta water to your sauce to help the dish come together, and it really works – even when you’ve cooked a pound of pasta in a gallon of water. So, if you reduce that ratio of water to pasta, you end up with super-charged pasta water, that’s almost a sauce by itself. Built-in sauce is helpful when your pasta recipe has four ingredients, plus it means that all you have to worry about adding to the pot is pure flavor. Like parmesan cheese and black pepper.

Hacking One Pot Pasta

One-Pot Cacio é Pepe

note: I usually half this recipe, for a more manageable two-person amount of food. It works really well.

Ingredients:
-1 pound angel hair pasta
-1 quart water (that’s 4 cups), salted (plus another cup of water on standby)
-1 cup freshly grated parmesan cheese (or pecorino, or both (on a microplane if you have one))
-lots of fresh-cracked black pepper

Method:
1. Drop pasta in a pot that will allow it to fit lengthwise and add water. All the pasta should be submerged in the water with the one pound to one quart ratio.

2. Season your pasta water with salt, keeping in mind that the water will reduce and be entirely absorbed by the pasta. You can add more salt at the end if necessary.

3. Cook the pasta over medium heat, stirring the noodles periodically to keep them from sticking together.

4. Taste your pasta to determine it’s doneness, and pull it off the heat when it’s just barely al dente. There should be a little bit of pasta water left in the bottom of the pot by the time the pasta reaches al dente (like 1/4 inch). If there is more than that, scoop out a tiny bit of the water with a ladle. If there is less, add a bit of water from your standby cup.

5. Add parmesan cheese and stir it into the pasta until the cheese is melted. Taste for seasoning and add salt if necessary. By the time the cheese is stirred in, the pasta water should be mostly absorbed or thickened enough to coat the noodles. If the pasta starts to lose it’s sheen or stick together, add another splash of water and stir.

6. Top with fresh-cracked black pepper and serve immediately

Because this pasta is sauced with super-starchy pasta water and cheese, it will want to start sticking together as it cools, just bring it back with a splash of water and a stir. You can also add a little olive oil or butter to help things out, but the best solution is just to eat it. If you can’t finish a whole pound of pasta in one sitting, make a half batch. You can re-heat the pasta over low heat with another splash of water, but the more water you add the further you get from al dente, because hot pasta will always want to absorb liquid, and the more it absorbs the mushier it gets. Basically, the faster you can eat this stuff the better.

Want to see how this method works with gluten-free pasta? Check out my One Pot Gluten Free Macaroni and Cheese.

  1. I wish I'd known about this a few decades ago. Definitely on next week's list.

    Carrie — November 18, 2014
    1. Thanks ma :)

      courtney — December 6, 2014
    2. reply
  2. Definitely going to give this a try but will use pecorino cheese instead.

    Marty — November 24, 2014
    1. Marty, thanks for stopping by! Pecorino is definitely traditional, and I'm sure it would taste great. I also like to mix pecorino and Parmesan when I have both on hand.

      courtney — November 24, 2014
    2. reply
  3. Would this method work for gluten free pasta? (I really miss regular pasta with the gluten, it was so much easier.)

    Jessica — December 4, 2014
    1. Hey Jessica! I have to admit, I've never tried it with gluten-free pasta, but I feel like it's probably possible. I'll have to try it and get back to you, and frankly, that's a really good question so if it does work, I'll do a whole post about it. Thanks for the idea :)

      courtney — December 4, 2014
    2. Hi, try to find a brown rice base pasta rather than the corn stuff and it *should* work, although I've not tested it. I find the brown rice stuff works most like wheat pasta of any alternative.

      Emmylou — December 5, 2014
    3. reply
  4. I've done a similar version of this with ramen noodles a few times (like the classy gal that I am), but perhaps it's time to try it with pasta. Haha. Thanks for this. Looks fantastic! (FYI: The ramen version is surprisingly delicious!)

    Allison — December 4, 2014
    1. Allison, I have been meaning to try this with ramen ever since I saw David Chang do it on that show, "Mind of a Chef". Ramen cacio e pepe is straight up brilliant, and basically if Dave Chang does it, everyone should do it IMO - so you win. Thanks for stopping by!

      courtney — December 4, 2014
    2. reply
  5. Any pasta at all that is good for a diabetic....the wheat stuff is heavy and untasty to me. Any ideas?

    redrover — December 4, 2014
    1. Honestly, I'm not very familiar with what's best for diabetic diets - would it be a rice pasta or something? I'm planning on trying a gluten-free version, but I don't know if the carb count is any better with gluten free pasta. What type of pasta do you typically like to eat? I'll see if I can get it to work in a one-pot recipe.

      courtney — December 6, 2014
    2. reply
  6. […] sweetsaltytart.com […]

    17 Recipes Every Lazy Girl Needs To Know | Breakfvst — December 4, 2014
    1. reply
  7. Congrats on being featured on BuzzFeed! That is awesome and this recipe is awesome and your pictures are incredible! You go girl!!!

    Maria — December 4, 2014
    1. Thanks Maria!! :)

      courtney — December 6, 2014
    2. reply
  8. oh wow this looks amazing! definitely going to try this out ASAP. thank you for the recipe!

    archita — December 4, 2014
    1. Thanks archita! I hope you like it!

      courtney — December 6, 2014
    2. reply
  9. […] sweetsaltytart.com […]

    17 Recipes Every Lazy Girl Needs To Know - i fucking love food — December 5, 2014
    1. reply
  10. […] Consigue la receta: Pasta Cacio é Pepe […]

    17 recetas que toda chica perezosa necesita conocer - LasSociales.co — December 6, 2014
    1. reply
  11. Eating this now. It is delicious, thank you!

    Tina — December 6, 2014
    1. Tina! I'm so flattered you made it and so happy you like it. Save some for meeeee :)

      courtney — December 6, 2014
    2. reply
  12. So simple and tasty... The only issue I have with it is some if the cheese will turn into big clumps. Also I added some To the mix, delish!

    sarah — December 7, 2014
    1. Hi Sarah! Glad you liked the flavor - I've never had issues with cheese clumping together, but I'd guess it's because it's wasn't grated finely enough and couldn't melt thoroughly, or that the cheese was added to the pot while over really high heat, which would cause it to get a hard grainy texture. Would either of those fit what you saw? Either way, hard to beat good old cheese and pasta.

      courtney — December 7, 2014
    2. reply
  13. […] sweetsaltytart.com […]

    17 Recipes Every Lazy Girl Needs To Know | Low Boredom — December 9, 2014
    1. reply
  14. […] sweetsaltytart.com […]

    Bangkok Breaking News | 17 Recipes Every Lazy Girl Needs To Know — December 9, 2014
    1. reply
  15. […] sweetsaltytart.com […]

    17 Recipes Every Lazy Girl Needs To Know ⋆ The NEW N!FYmagThe NEW N!FYmag — February 25, 2015
    1. reply
  16. Should the pot be covered at any point? Should the water reach a boil at any point, or will it cook before boiling? I'm very excited to try this out :)

    madeline — March 31, 2015
    1. Hey Madeline! Thanks for stopping by. No need to cover the pot - you will have to stir the noodles periodically to keep them from sticking and the cooking happens too quickly for much water to evaporate. If you cook the pasta over medium heat you should reach kind of a low boil, but don't worry too much about it. I hope you like it the pasta! And if you have any questions or problems when you make it don't hesitate to comment or email :)

      courtney — March 31, 2015
    2. reply
  17. […] sweetsaltytart.com […]

    Recipes for lazy girls | UCookforU — April 15, 2015
    1. reply
  18. I apologise in advance for being such a pain in the neck. I think that this method is perfect for lazy girls (like me) and I am not a morbid tradition fan (I am Italian) but I have to point out this: if you don't drain pasta all the wheat starch (that foam that forms over water while it's boiling) stays inside the pan. And that's really baaaaad for your diet. I mean, cacio e pepe is already a rich dish, don't you think?

    Sara — May 4, 2015
    1. I get what you're saying, but if I'm not celiac I don't see how this is any worse than risotto, (which retains all the rice starch). For me it's just carbs, which contribute to the texture of the finished product in a way that might otherwise be achieved with more cheese or fat (neither of which are especially wholesome). It's rich, and it's not the kind of thing I eat more than once or twice a year, but I think the idea of risotto-ing pasta has some fun implications, which is the main reason I made this and wrote about it. I get what you are saying though. I'll have to look into the nutrition differences between drained pasta and risotto-ed pasta. You got me curious.

      courtney — May 4, 2015
    2. reply
  19. […] Get the recipe: One-Pot Cacio é Pepe […]

    17 Recipes Every Lazy Girl Needs To Know — June 23, 2015
    1. reply
  20. […] sweetsaltytart.com […]

    5 Recipes Every Lazy Girl Needs To Know - Good Food Ideas — July 10, 2015
    1. reply
  21. […] If my description of the one-pot-pasta recipe confuses you, check out this blog post. She describes the process better, and even has visuals! It also contains a one-pot pasta recipe […]

    Spicy Teriyaki Noodles with Tofu and Garbanzo Beans | Speculating Sunrise — July 12, 2015
    1. reply
  22. […] Get the recipe: One-Pot Cacio é Pepe […]

    Each Lazy Girl Should Know These 7 Recipes — July 23, 2015
    1. reply
  23. Would you change the water/pasta ratio if you used spaghetti instead of angel hair?

    Kara — August 16, 2015
    1. Hi Kara! The ratio should still work with spaghetti. I'd keep an extra cup of water on standby in case the pasta soaks up more water than you expect, and add a little bit at a time if the water seems to be soaking in quickly and the pasta still has a long way to cook. It's easy to take liquid away with a ladle when it's finished cooking too, so the recipe is pretty forgiving. I've used this same ratio for a few different pasta shapes and it has worked well for me. If you have any issues though, let me know. I'm always curious to hear how my recipes work for people at home!

      courtney — August 16, 2015
    2. reply
  24. […] The Lazy Cook’s Guide to One-Pot Pasta, Featuring: Cacio e Pepe | Sweet Salty Tart. […]

    One pot pasta with four ingredients | Easy Recipe List — August 16, 2015
    1. reply
  25. […] sweetsaltytart.com […]

    17 Recipes Every Lazy Girl Needs To Know | Eldezer News — August 20, 2015
    1. reply
  26. […] ingredient list is four items long — pasta, water, pepper, and parmesan — and you don’t even have to […]

    20 Lazy Recipes Anyone Can Master | 22 Words — October 16, 2015
    1. reply
  27. […] Recipe adapted from: http://sweetsaltytart.com/2014/11/the-lazy-cooks-guide-to-one-pot-pasta-featuring-cacio-e-pepe/ […]

    Fancy Mac N’ Cheese | Meal Time for No Time — October 23, 2015
    1. reply
  28. […] This dish includes four ingredients you probably already have in your kitchen, The best part is you don't eve have to drain the pasta. […]

    Weggl | 20 Fail-Proof Recipes Perfect For Lazy People — November 11, 2015
    1. reply
  29. […] One Pot Pasta […]

    45 Easy Recipes Every Lazy Girl Should Know - Wachabuy — November 28, 2015
    1. reply
  30. Thank you for answering my question of water-to-past ratio! I like cooking it this way because using bone broth instead of water is an easy way to get more broth in your diet. And by the way, your picture taking is on point! Bradleigh

    Bradleigh Huizinga — January 19, 2016
    1. Thanks Bradleigh! That's such a clever idea! It makes perfect sense too because any time you make risotto, you use broth, and one pot pasta is very similar. I'm going to try that!

      courtney — January 22, 2016
    2. reply
  31. […] sweetsaltytart.com […]

    17 Recipes Every Lazy Girl Needs To Know | Spiderzoom — February 15, 2016
    1. reply
  32. […] already knew one pot pasta was a thing, and I’d even successfully macaroni and cheese’d some gluten free pasta […]

    One-Pot Three-Cheese Mac | Sweet Salty Tart — June 7, 2016
    1. reply
  33. Need a print key button. So can print out just the recipe and directions. Also if need photos have but can remove it don't need visual. thanks

    Wanda — June 10, 2016
    1. reply
  34. I have been doing this for years. I add a splash of heavy cream , garlic and a bit of butter to the mix at the end. Sometimes chicken and any veggies. Yumm-O.

    Joy B — June 10, 2016
    1. reply
cancel reply

Pumped-Up Pumpkin Pie

Pumped-Up Pumpkin Pie

I know, the title. But I couldn’t help it.

There aren’t many sacred Thanksgiving recipes on my family’s holiday table. We experiment with turkey preparations and swap out stuffing recipes pretty freely, but this pie is not up for discussion.

Pumped-Up Pumpkin Pie

I’ve railed against the over-saturation of pumpkin desserts in the fall. I don’t really get pumpkin chocolate chip cookies (cookies should be crispy on the edges!), and adding pumpkin to cake just makes it dense and cloddish. I’d like to make it clear that this is where pumpkin and it’s associated spices belong. Preferably at max volume.

Pumped-Up Pumpkin Pie

Everyone thinks their mom’s pie is the best. But this pie, MY mom’s pie (which she got from my grandma), goes to 11.

What makes this one great is spices – many of them, and in relatively large amounts. But there’s a secret one! Isn’t that fun? And it makes all the difference in the world. It’s BLACK PEPPER. Just the tiniest bit compliments the ginger and cinnamon and sort of stings your tongue in a way that makes you need another bite. Nobody will be able to put their finger on it, but they’ll notice this lovely heat that cuts through the sweetness and butter and cream and makes the pumpkin spice feel like real spice.

Pumped-Up Pumpkin Pie

Speaking of cream though, let’s be real.

Pumped-Up Pumpkin Pie

That’s better.

Pumped-Up Pumpkin Pie

Pumped-Up Pumpkin Pie

Pumped-Up Pumpkin Pie
(loosely adapted from The Spice Cook Book)

Ingredients:
-your favorite pie crust
-1 Tbsp flour
-3/4 cup sugar
-1 tsp salt
-1 tsp cinnamon
-1/2 tsp ground nutmeg
-1/8 tsp ground cloves
-1/8 tsp fresh, finely-ground black pepper (though, sometimes I’ll almost double it)
-1/4 tsp dry ginger
-2 tsp fresh grated ginger (or very, very finely minced)
-1 cup half and half
-1 small can pumpkin (15 oz)
-3 eggs
-whipped cream, for topping

Method:
1. Prep your favorite nine-inch pie crust recipe. I like to use a regular old pate brisée recipe, but sometimes I use Trader Joe’s and it’s still delicious. I recommend blind-baking to avoid the soggy bottom-crust issue, though it does make an extra step. To blind bake your crust, stash your prepped crust in the freezer while your oven preheats to 450F. Then remove your crust from the freezer, line the crust with parchment paper and weight it down with uncooked rice or pie weights (every time I skip the weights, my crust just falls down the sides of the pan). Bake for 15 minutes. If you want more info about blind baking, read this.
2. In a mixing bowl, combine the flour, sugar, salt, cinnamon, nutmeg, cloves, ground pepper, and ginger. Whisk to combine and ensure any lumps of flour or cinnamon are worked out.
3. Add half and half, pumpkin, and eggs to the spice and sugar mix, and whisk to combine.
4. Pour the pumpkin mix into your pre-baked pie shell (remove the parchment and weights first, obviously) and bake at 350F for 50 minutes, or until the pie is no longer jiggly in the middle. Bouncy is ok, but not jiggly. (If you skipped blind-baking, bake your pie in the raw crust at 400F for 45-50 minutes.)
5. To keep your pie from splitting, cool it down slowly. When it’s done baking, turn the oven off and crack the door to let some of the heat out. Once the oven reaches room-temperature, remove your pristine pie for admiration. If you don’t care about cracks, you can skip this step completely.
6. DEFINITELY top your pie with whipped cream. I like making my own with heavy cream, sugar, and a pinch of salt, whipped up until it’s fluffy. Most of my family, on the other hand, prefers cool whip. Both are allowed.

  1. That's beautiful! The pepper really does make it wonderful. And for me, the real whipped cream beats Cool Whip every single time.

    Carrie — November 12, 2014
    1. I know right? That pepper is huge. And I think the twins are on the fresh cream band wagon too, but I'm not sure about my dad, or yours!

      courtney — November 12, 2014
    2. reply
  2. Gorg! I'm hungry now.

    Caroline — November 12, 2014
    1. reply
  3. […] Pumpkin Pie from Sweet, Salty, Tart […]

    cranberry apple walnut tart | Garlic + Zest — November 26, 2014
    1. reply
  4. Definitely real cream! And pepper? Interesting.... Looks delish.

    Suzanne — November 20, 2016
    1. reply
cancel reply

Overnight Blueberry Almond Butter Oatmeal

Overnight Blueberry Almond Oatmeal

This recipe is part of a series of posts especially for college students and first-time cooks, made using only items from the College Pantry and equipment from the College Kitchen.

Oatmeal isn’t super glamorous – I used to associate it with bran flakes and fiber and joyless cholesterol-lowering health benefits. But oatmeal is a filling and nutritious blank canvas that only wants to keep us full and happy while we go about conquering our various tasks. This particular combination of blueberries, almond milk, almond butter, and honey reminds me of a real-food, extra delicious version of the blueberries and cream packets you can buy at the grocery store.

Overnight oatmeal has gained a lot of popularity over the last few years because it can be made days in advance and it’s ready to eat straight out of the fridge. What I like best is that with overnight soaking, the oats hydrate but they don’t turn into wallpaper paste the way they do when they’re cooked. These oats are great cold, but if you want ’em hot, a minute in the microwave does the trick. So with a little planning, you can have a really delicious and satisfying breakfast waiting for you when you wake up. This recipe is perfect for college students, or really anyone who doesn’t have time to make themselves real food in the morning.

Overnight Blueberry Almond Oatmeal


Overnight Blueberry Almond Butter Oatmeal

Ingredients:
2/3 cup almond milk (I like unsweetened, vanilla flavored)
2 tsp. almond butter (crunchy or creamy, both are awesome)
2 tsp. honey
pinch of salt
1/2 cup rolled oats
1/4 cup frozen blueberries (fresh would also work)

Method:
1. In a bowl or plastic food storage container, mix together almond milk, almond butter, honey, and salt.
2. Add oats and blueberries and stir to incorporate. (You can wait to add blueberries until the morning if you want, but adding them before will save you a step when you wake up.)
3. Cover with plastic wrap or lid, and chill overnight or up to three days.
4. Enjoy it cold, straight out of the fridge or microwave it for 60 seconds on high for a hot breakfast. Top with more honey, almond butter, or blueberries if you like.

  1. New reader to your blog.. in LOVE with it! Your pictures are stunning and your recipes are so creative. I make overnight oats every morning and they never fail to be one of my favorites breakfasts. I like to add maple syrup instead of honey... so yummy!

    Leigha @ The Yooper Girl — November 9, 2014
    1. Hey Leigha! Thanks for stopping by! I'm with you on the maple syrup, oats and maple just go.

      courtney — November 9, 2014
    2. reply
  2. […] family and guests with the smell of blueberry almond French toast. This video is part of Monthly Meal Makovers with Ellie Krieger show SHOW DESCRIPTION […]

    Blueberry Almond French Toast-Food Network — February 9, 2015
    1. reply
cancel reply

One Pot Beef and Broccoli Noodles

One Pot Beef and Broccoli Noodles

This recipe is part of a series of posts especially for college students and first-time cooks, made using only items from the College Pantry and equipment from the College Kitchen.

So, this meal isn’t very pretty. I’m blaming my over-enthusiastic sriracha hand for the fugness here, but I wouldn’t be sharing this if it wasn’t delicious. And easy!

I’ve hacked the ever popular one-pot noodle formula for a really tasty, beefy broccoli-ey version. This recipe also makes enough to feed an entire dormitory hall. I’m exaggerating, but conservatively I’d say this serves at least six.

Finally, I have to give a little product recommendation. Frozen broccoli, while convenient and healthy and life-saving in many applications, is rarely pretty. But Whole Foods frozen broccoli is convenient and healthy and actually quite nice looking. Just look at those perfect little florets! Not a stemmy chunk in sight.


One Pot Beef and Broccoli Noodles

Ingredients:
1 lb ground beef (or turkey)
2 cloves garlic, minced
2 Tbsp soy sauce
1 Tbsp honey
2 tsp sesame oil
1 tsp neutral-flavored oil (like peanut)
1 onion, sliced
1 lb whole wheat angel hair pasta
1 qt water (4 cups)
2 tsp better than bouillon
1 small bag frozen broccoli

Method:
1. In your biggest, deepest pot, brown meat over medium-high heat while breaking it up with a spatula or spoon. When the meat is cooked, drain off the fat. Add minced garlic, soy sauce, honey, and sesame oil and stir to combine. Remove meat to a plate and set aside. You will add this back to the noodles at the end.
2. In the same pot, heat 1 tsp neutral-flavored oil and cook sliced onion until slightly browned and translucent.
3. Add dry angel hair pasta to the pot with the onions, breaking the noodles in half if they don’t fit whole. Cover with water (I needed 3 cups at first) and add bouillon.
4. The pasta will absorb water as it cooks. The goal is to add enough water for the pasta to reach al dente texture, but not leave a lot of liquid behind. Stir the pasta while it cooks to keep it from sticking to itself.
5. Once the pasta is pliable, add the frozen broccoli and the fourth cup of water. Continue to cook and stir until the pasta is al dente. How do you know when it’s done? You taste it.
6. Add the meat back to the pasta and stir it to distribute. Taste the finished dish and add more soy sauce if it’s needed. Top with sriracha, but maybe be more delicate about it than I was.

This meal doesn’t freeze awesomely, so get some friends to help you eat it, or make a half-batch. It will keep in the fridge for 4-5 days. Another good option is cooking the meat with it’s seasonings, onions, and broccoli together without the noodles and serving it over rice. The meat/onion/broccoli mix will freeze well in freezer bags.

  1. Love one pot meals.. this is definitely one I will be making for dinner tonight. Just need to get my hands on the ingredients now!

    Thalia @ butter and brioche — November 7, 2014
    1. Thanks Thalia! If you have time, I'd love to know what you think of the finished product. It's a super-utilitarian kind of dish, but I think it's tasty!

      courtney — November 8, 2014
    2. reply
cancel reply