Japanese Fried Chicken Salad with Sesame Soy Dressing

Japanese Fried Chicken Salad with Sesame Soy Dressing

Sometimes I really want fried chicken for dinner. This puts me in a difficult position because I dislike frying intensely. Throttling the burner to keep the oil at the right temperature, resigning my forearms to grease splatters, and that fast-foody smell that lingers about 48 hours after dinner – by the time I’m done frying a batch of chicken I’m basically tapped-out. Sides tend to be an afterthought, but no woman can live on fried chicken alone. This salad is my favorite counterpoint to Japanese karaage-style fried chicken because it’s fresh and light and easy to throw together, not to mention delicious.

Japanese Fried Chicken Salad with Sesame Soy Dressing

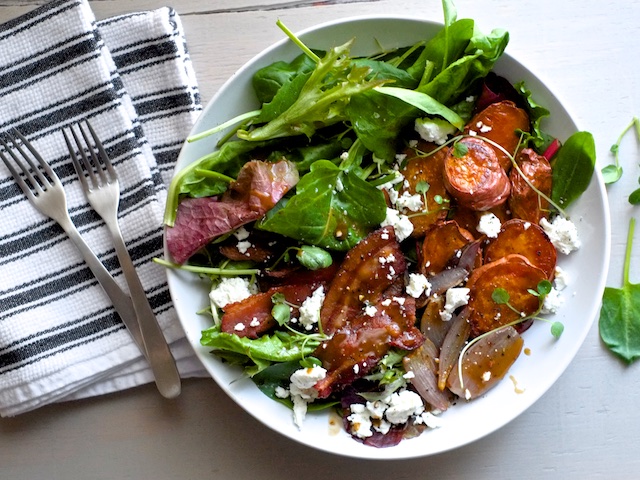
Honestly, this salad can stand on it’s own, especially when it has that much avocado on top. If I weren’t in the mood for frying I would eat this by itself or maybe with a handful of toasted almonds, some grilled chicken, or maybe salmon on top.

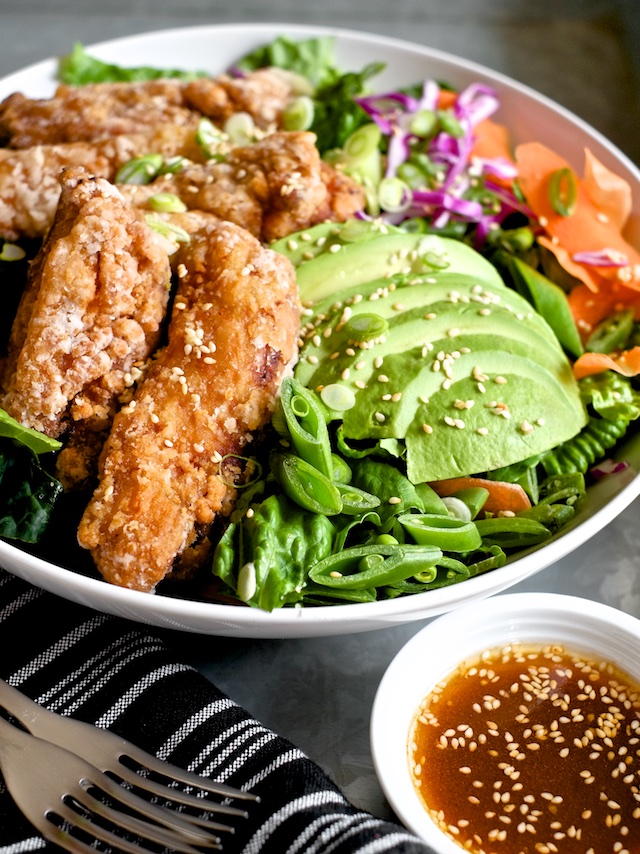
The dressing is probably the biggest revelation though, because I always always have all the ingredients I need to put it together (except sesame seeds, but they’re more for looks than flavor here anyway). It’s literally a pantry dressing, and you can get as creative with the greens and add-ins as you like. Here I’ve used kale and romaine with cabbage, carrots, snap peas, and green onions, but I’ve served this dressing on a kale and cabbage slaw and a straight romaine salad and both worked well. Give your chicken a few hours to marinade and chop your salad before you start to fry. Then you can dress the salad and throw the karaage on top and you’re ready to eat.

Japanese Fried Chicken Salad with Sesame Soy Dressing

Japanese Fried Chicken Salad with Sesame Soy Dressing
serves 2-3

Ingredients:
1 recipe karaage (plan on about 1 breast or 2 thighs per person – don’t forget oil for frying and potato starch)

for the salad:
1 head romaine lettuce
4-5 leaves kale, chopped
1/4 small head red cabbage, shredded
1 carrot, peeled into ribbons
1/2 cup snap peas, sliced
3-4 green onions, sliced
1/2 avocado per person

for the dressing:
2 tsp toasted sesame seeds (plus another teaspoon or two to scatter on top)
1 Tbsp low sodium soy sauce
1 Tbsp rice vinegar
2 Tbsp neutral-flavored oil (I like peanut oil)
1/2 tsp toasted sesame oil
1/2 tsp honey
1/2 tsp sriracha
1 clove garlic, minced or grated

Method:
1. At least 4 hours and up to a day before, make the marinade for your karaage, pre-cut your chicken into strips, pour the marinade over the chicken and stash it in the fridge.

2. Before you begin frying, take your chicken out of the fridge to come up to room temperature. While it’s losing it’s chill, prep your salad and dressing. Wash your greens, peel your carrots, shred your cabbage, and slice the peas and onions – you can then pre-arrange the salads in your serving bowls or put everything together in a large salad bowl. In a smaller mixing bowl, whisk together sesame seeds, soy sauce, rice vinegar, neutral oil, sesame oil, honey, sriracha, and garlic and set it aside.

3. Preheat your frying oil in a deep-sided pot over medium heat. If you are using a thermometer to monitor the frying temperature, shoot for 350-375 (you may have to nudge the heat past medium to reach 350, but it’s better to undershoot and hit 350 slowly than overshoot and end up with a pot of smoking oil – be patient here, it’s worth it). Prep a landing spot for your chicken, like a cookie sheet in a warm oven or a cooling rack set over a tray. When your oil is hot enough, coat your marinated chicken in potato starch (dunk them one by one and roll them around until they are nicely covered – rubber gloves are great for this).

4. Fry your potato starch-coated chicken in small batches until the chicken is cooked through and the outside is nicely golden brown (the soy sauce marinade will cause some dark spots and the potato starch will fluff up and create some white bits, but that’s all good). Taste a piece of chicken to make sure it’s well-seasoned – if your marinade time was short, you will need to add a little salt.

5. Assemble your salads, top with dressing, slice your avocado, pile on the fried chicken, and finish with a final sprinkle of sesame seeds.

cancel reply

Breakfast Strata with Sausage, Spinach, and Gruyere

Breakfast Strata with Sausage, Spinach, and Gruyere

Bread pudding doesn’t have to be sweet, you know – and when it’s not, I think it sounds better as a strata (fancy name, basically the same thing). Pudding’s not such a great word to begin with, but “savory pudding”…no thanks. Breakfast strata? Don’t mind if I do.

Breakfast Strata with Sausage, Spinach, and Gruyere

We’ve covered all the basics of bread pudding construction in my last post, so all you really need to know for this one is: challah bread, hot breakfast sausage, spinach, onions, gruyere cheese, salt, and a pinch of nutmeg. It’s my favorite breakfast casserole that I’ve ever tried, and actually kind of handsome, for a pudding.

Breakfast Strata with Sausage, Spinach, and Gruyere

Breakfast Strata with Spinach, Sausage, and Gruyere

Ingredients:
-hot breakfast sausage (about a pound for a 9×9 casserole, two pounds for a 9×13)
-1-2 onions, sliced into longitudinal strips (every piece will be pretty even in size this way)
-a splash of white wine or apple cider vinegar
-spinach (about 2-3 cups fresh, 1 cup frozen)
-gruyere cheese, grated (about 3-4 cups, depending on the size of your casserole)
-challah bread, cubed (enough to fill whatever casserole dish you’re using)
-eggs (about 1 per cup and a half of cubed bread – eyeball it)
-half and half (1/2 cup per egg)
-nutmeg, a pinch – you want to just barely taste it
-salt

Method:

1. In a skillet set over medium heat, brown the sausage while breaking it up with a wooden spoon and set it aside.

2. In the same skillet that you used for the sausage, cook the onions in the left over fat until they are slightly browned. Season the onions with a pinch of salt and a splash of vinegar (cooked onions always taste a little better with a small splash of vinegar).

3. If you are using fresh spinach, add it to the pan with your onions to wilt, if you are using frozen spinach you can defrost it in the pan with the onions. Cook the spinach and onions until they are no longer releasing water, the onions are browned around the edges, and the spinach is soft and wilty. Season veggies to taste with salt.

4. Grate your gruyere cheese and cube your challah.

5. Butter your casserole dish and create a solid layer of challah in the bottom of the dish – really squeeze in a piece of bread wherever you can so the bottom is completely covered. Then add about 1/3 of your cheese, 2/3 of the sausage, and 2/3 of the spinach and onions, followed by another 1/3 of the cheese. Cover the sausage and veggies (more loosely this time) with the rest of the bread cubes. Top with the last of your sausage and vegetables.

6. Whip up your custard with one egg per cup and a half of bread (eyeball it – it’s easy to make a little more if you need to) and 1/2 cup of half and half per egg. (My small dish, filled to overflowing with bread, used about 4 eggs and 2 cups of half and half). Season the custard with 1/4 teaspoon of salt per egg, and a pinch of nutmeg.

7. Pour the custard over the assembled casserole, being sure to saturate all of the dry bread cubes that are sitting on the top. Use as much custard as is needed to saturate the bread and leave a liquid line about 1/2 way up the side of your casserole dish.

8. Top your casserole with the last of your cheese, cover with plastic wrap, and let it rest for at least 2 hours and up to overnight.

9. When it’s ready to bake, turn your oven to 325F. Remove the plastic wrap from the casserole and replace it with aluminum foil. Bake the casserole for at least 45 minutes covered, then uncover and bake for at least 15 minutes more, or until a knife inserted near the center of the casserole comes out clean. If you want a very brown and crispy top to your casserole, turn on the broiler for a minute or two (but keep an eye on it because cheese burns quickly). Allow the casserole to cool for about 10 minutes before serving.

  1. This was delicious! I was nervous about it because I've never made one of these before and I picked Easter Sunday, of course, to give it a try. I used 8 eggs and 4 cups of cream for my 13" x 9" pan, and baked it for 2 hours. Probably would have been done at 1.5 hours, but I wanted to make sure it was done. Everyone raved. Thanks for a great recipe!

    Judy H — April 5, 2015
    1. Judy I'm so glad the recipe worked for you! I tend to worry that my "adjustable" recipes are too different for people to comfortably use, but they're just more practical IMO. Did you use cream instead of half and half? I might have to try that myself - it sounds decadent in the best way. Thanks for returning and reporting!

      courtney — April 5, 2015
    2. reply
cancel reply

The Last Bread Pudding Recipe You'll Ever Need

The Last Bread Pudding Recipe You'll Ever Need

Last week we deconstructed french toast. This week I want to talk about bread pudding. Bread pudding is literally the casserole version of french toast, so for brevity’s sake I’m going to refer you that post for my reasoning on milk and custard ratios. Bread, on the other hand, behaves differently in casseroles and requires a bit of further discussion.

The Bread: Some people will probably disagree, but in my opinion, chewy/crusty bread works really well in french toast. The extra crispy surface area and relatively short soak time make for a rich french toast with good textural contrast. BUT chewy bread DOES NOT WORK in bread pudding. You get that crunchy top layer, yes, but the lower layer soaking in milk and egg turns the over-developed chewy bread gluten into paste. Chewy, gummy, sticky paste. It is UNPLEASANT. I highly recommend choosing a soft, delicate bread for bread budding – one that will practically melt into the custard.

The Custard: I like simplicity, and it turns out the ratio of egg to half and half used in our french toast works really well for bread pudding too. That’s one egg to 1/2 cup half and half. You can add sweetener for sweet versions of bread pudding, or salt and pepper for savory takes.

The Vessel: Go for something with straight vertical sides – round, oval, or square at the base doesn’t matter. The size is important though, because it will determine how many people you can serve, how much bread you need, and how much custard you need. You will need enough cubed bread to fill the casserole dish, and enough custard to saturate all the bread and fill the dish (meaning there will be an actual liquid level after saturating the bread) about half of the way up the side of the dish.

The Extras: Go with breakfast stuff for savory puddings: sausage, cheese, and veggies are my favorites. For sweet versions choose fruits, nuts, and even cheeses or chocolate. But really, use some additions, or you’re in for a boring meal. I also recommend pre-cooking anything raw to keep any water released from messing with the custard.

The Rest: Even more than french toast, bread pudding needs time to rest and evenly distribute the custard through the bread. I recommend a minimum of two hours, but overnight works best if you’re planning on serving bread pudding for breakfast.

The Cook: Low and slow in the oven is the best way to cook bread pudding, covered for the first 3/4 of the time, and uncovered at the end to crisp the top (with an optional finish under the broiler for extra browning). The exact time will depend on the size and depth of the dish you use, but plan on at least an hour of bake time at 325F. The best way to tell when the casserole is done is to insert a knife near the center of the pudding, when the knife comes out clean, the pudding is done.


The Last Bread Pudding Recipe You’ll Ever Need

Ingredients:
-soft bread, cubed (like challah or white bread, enough to fill your casserole dish)
-eggs (about one per cup and a half of cubed bread – eyeball it)
-half and half (1/2 cup per egg)
-flavoring for custard (about 1 Tbsp sugar per egg for sweet (plus a pinch of salt), 1/4 tsp. salt per egg for savory)
-extras (fruit, nuts, chocolate etc. for sweet, sausage, bacon, cheese for savory (amount not important as long as it all fits in your casserole dish))
-butter, for the casserole dish

Method:
1. Cook your extras if necessary and set them aside to cool.

2. Butter your casserole dish and cube your bread.

3. Fit a solid single layer of bread cubes in the bottom of your casserole dish, then layer in filling, cover with more bread and top with a little bit more of the filling (so people know what’s in it).

4. Mix up your custard using a blender or a whisk, and add sugar or salt and any optional spices.

5. Pour your custard over your assembled casserole, being careful to saturate all the bread cubes at the top of the casserole, and make enough that the dish is about 1/2 full of custard (much of which will be absorbed while it rests).

6. Cover the unbaked casserole tightly with plastic wrap and let it rest in the fridge for at least two hours and up to overnight.

7. Remove plastic wrap from casserole, replace with foil, and bake in a 325F oven for at least 45 minutes. Then uncover the casserole and bake at least 15 minutes more, or until the custard is set and a knife inserted in the center comes out clean. Let the bread pudding rest for about 10 minutes before serving.

*The photo on this post is a savory bread pudding with cheddar cheese, breakfast sausage, bell pepper, jalapeño, onion, and green onion on top. I cooked the bell pepper, jalapeño, onion, and sausage beforehand, layered it up with cheese and bread, poured on the custard, and baked it. Easy.

  1. […] The Last Bread Pudding Recipe You’ll Ever Need. Did you know that most breakfast casseroles are just bread pudding in disguise (frequently named […]

    Six Make-Ahead Recipes for Christmas Morning | Sweet Salty Tart — December 23, 2015
    1. reply
  2. […] and method on The Kitchn. Amidst my page of notes from various sites, I used the baking time from Sweet Salty Tart. (She suggests baking the bread pudding 3/4 of the time covered, 1/4 of the time uncovered.) It […]

    Gluten-Free Pumpkin Bread Pudding - MI Gluten Free Gal — December 2, 2016
    1. reply
cancel reply

Croissant French Toast

Croissant French Toast

So, Cody loves french toast. A few weekends ago I wanted to get out of the house and see a matinee, but Cody was on teenager time and resisted my attempts to get him moving before noon. I decided to do something he couldn’t ignore: make french toast. BUT all I had to work with bread-wise was a stale croissant. Resourceful girl that I am, I dunked said croissant in custard, fried it in butter, and presented it. To use the man’s own words, “this is better than regular french toast, but there should be more of it.”

The delicate custard I talked about in my “last french toast recipe you’ll ever need” post is great for this, but pay attention to the soak time if you want your croissant to retain some crispness – a short soak is all this delicate pastry needs. Rest time is also mandatory, or you will absolutely end up with scrambled egg pockets. Do it right, and you will be rewarded with the lightest, crispiest french toast possible.

Croissant French Toast

If you read my last post, you wont need a recipe to make this, but for those of you who didn’t, I’m happy to spell it out.

Croissant French Toast

Ingredients:
-croissants, at least one per person
-1 egg for every two croissants
-1/2 cup half and half per egg
-1/4 tsp cinnamon per egg
-1 tsp honey per egg
-butter, for cooking
-maple syrup, powdered sugar, and fruit for serving

Method:
1. Split croissants in half and set aside.

2. Make custard by blending egg, half and half, cinnamon, and honey.

3. Soak croissant halves cut side down for 15 seconds, then flip and soak for another 15 seconds.

4. Set soaked croissants on a paper-towel lined baking tray for at least 1 minute to let the custard disperse through the croissant and the excess drain away.

5. If you’re serving a couple of people, set a pan over medium-low heat and cook the croissants in butter until nicely browned on both sides and the custard is set (about 2 minutes per side). If you are serving a crowd, turn the pan to medium-high and brown the croissants on both sides, but don’t worry about setting the custard. When the croissants are brown, line them up on a baking tray and put them in a 300F oven for 5-10 minutes to finish cooking through.

6. Top with powdered sugar or maple syrup (or both) and serve with fruit.

  1. This looks FANTASTIC! I can't wait to try it.

    Erin @ Lemon Sugar — March 31, 2015
    1. Thanks Erin! Let me know how it goes when you do!

      courtney — March 31, 2015
    2. reply
  2. I made some croissants a while back and think they're too stale at this point so this looks like a perfect way to re-purpose them! Thanks!

    Scott — April 1, 2015
    1. Hi Scott! I'm impressed that you made your own croissants. I've still not ventured into the realm of laminated dough, so nice work! And yes, stale croissants are perfect for this, they might need a touch more soak time though. I hope you like it!

      courtney — April 1, 2015
    2. reply
cancel reply

The Last French Toast Recipe You'll Ever Need

The Last French Toast Recipe You'll Ever Need

Understanding french toast begins with deconstruction and ends with deeeliciousness? (So lame, I’m sorry.) I really believe that the better you understand a food the easier it is to riff and cook it on the fly. So let’s break it down, put it back together, and drown it in syrup.

The Milk: I like half and half – it’s fatty enough to give the french toast a delicate richness and thin enough to give the custard good soaking abilities. Whole milk is ok, 2% can work if you’re desperate, but if you’re serious about french toast, use half and half.

The Ratio: I’m talking about how much half and half you use per egg. And I like to use a ratio here because it gives you the flexibility to make a few slices or a huge batch without too much fancy math. You want custard that’s rich yet delicate – a balance achieved with the ratio of one egg per half a cup of half and half.

The Bread: Lots of recipes recommend challah or brioche, and those are good, but I also adore sourdough and chewy breads with crisp crusts. Definitely slice the bread at least 3/4 inch thick, and up to an inch. Technically, you can french toast any bread you want with a little finesse…

The Soak: The bread you use will dictate the length of time it needs to soak. Light and delicate breads like white bread or croissants (yesss, you can french toast croissants) call for a shorter soak: like 15-20 seconds per side. Dense and chewy breads will need more time: as much as a minute per side. Properly soaked toast will have taken on some liquid weight, but won’t be falling apart when you try to move them out of the custard.

The Rest: I get that sometimes you’re in too big of a hurry to really let the french toast rest between the soak and the pan, but a short time between steps will really improve the texture of the final product, by allowing the bread to distribute the custard evenly through the center of the bread and shed any excess. If you use a bread with a large hole-structure do NOT skip this step, unless you like the idea of thick scrambled egg pockets in your lovely delicate french toast.

The Last French Toast Recipe You'll Ever Need

The Flavoring: If you’re making sweet french toast, (which you usually will be) I recommend adding a little sugar or honey to the custard for both flavor and extra-brown crispy caramelization in the pan. Cinnamon is classic, but you can get really creative here if you want – vanilla bean, nutmeg, black pepper – or take it savory with minced garlic or hot sauce (omitting the sweetener, obviously).

The Fat: Butter, always. The end.

The Cook: Go with a cast iron or nonstick pan on medium-low heat for about 2-3 minutes per side to set the custard and brown the outside (more if your toast is very thick). If you’re serving a group, bump up the heat to medium-high and focus on browning the toast. Worry less about setting the custard because you’ll be employing the oven to cook the toast through. After your batch is browned, place the french toast on a baking sheet and put it in a low, 300F oven for 10 minutes.

Now let’s put it together.

The Last French Toast Recipe You'll Ever Need

The Last French Toast Recipe You’ll Ever Need

Ingredients:
-your favorite french-toasting bread, sliced 3/4 to 1 inch thick.
-eggs, about one for every 3-4 slices of toast
-half and half, one half cup per egg
-1/8 tsp salt per egg
-1 tsp sugar or honey per egg (if making sweet french toast)
-butter, for cooking (keep a stick at the ready to re-load between slices)
-optional spices and herbs (for cinnamon, use about 1/4 tsp per egg)

Method:
1. Slice bread to desired thickness and set aside.

2. Make custard by whipping together eggs, half and half, salt, and sugar or any flavoring you’re using. I like to use a blender for perfectly smooth custard, but a whisk will do. Pour the custard into a wide bowl or pie tin.

3. Soak bread between 15 seconds and 1 minute per side, depending on the type of bread. Delicate breads should be soaked 15-20 seconds. Denser breads can need up to a minute per side.

4. Set the bread on a paper towel-lined baking sheet or plate and let it rest for at least a minute.

5. If you’re making a few slices, heat your pan to medium-low, add a tablespoon or two of butter, and cook your french toast 2-3 minutes per side or until the outside is satisfactorily brown and the custard is set in the middle (you may need more time per side if your toast is very thick and dense) and serve. If you’re making a big batch, set the pan to medium-high, add butter, brown the french toast on both sides, and place on a baking sheet. When all the toast is browned, line it up on the baking sheet and put it in a 300F oven for 10 minutes and serve.

  1. Awesome tips - especially the 'finish it in the oven' one. French toast for a crowd always seems intimidating, but using the oven to finish/hold the batches would make it so much easier.

    April @ Girl Gone Gourmet — March 19, 2015
    1. Thanks April! Timing is one of those things most people don't think about and most recipes don't mention, but it's probably the trickiest thing about cooking in my opinion, especially when you're feeding a crowd!

      courtney — March 24, 2015
    2. reply
  2. […] To read more tips on perfect french toast, visit sweetsaltytart.com.  […]

    Perfect French Toast | It's Penelope's Place — May 4, 2015
    1. reply
cancel reply

Simple Tomato Soup

Simple Tomato Soup

There’s something about nostalgia that clouds judgement quite a bit. I have the absolute fondest memories of watching Jim Henson’s “The Dark Crystal” when I was little (vital essence! HISSSS), but I caught a snippet of it on tv in recent years and what. the. actual. hell. That movie is dark. And straaange. Probably affected my development in some deep way – but that’s neither here nor there. I’m really talking about canned tomato soup. I’ve gone back to it since growing up and it’s just never as good as I remember. Combine that with the fact that I no longer trust canned condensed soup and obviously there needs to be an update, in the form of a recipe. I can’t go back and make The Dark Crystal not weird, but I can grow up some soup for adult consumption.

Simple Tomato Soup

I feel like a mad scientist-thief for bastardizing this tomato sauce recipe (even more than I already have) but it’s just the perfect foundation for a smooth, slightly sweet, simple and nostalgic tomato soup. Marcella, you’re a genius, please don’t hate me.

Simple Tomato Soup

So basically you take Marcella’s famous tomato sauce, cook it down until the pot is almost dry when you scrape your spoon across the bottom, add chicken stock, a judicious bit of seasoning and heat, and buzz it up with a hand blender. I feel like this is how tomato soup is supposed to taste. And what’s a trip down memory lane without a proper sloppy grilled cheese? But maybe with a little gruyere mixed into the cheddar, because we’re grown ups.

Simple Tomato Soup

Simple, Nostalgic Tomato Soup
serves 3-4

Ingredients:
-2 14.5 oz cans diced or crushed tomatoes
-3-4 Tbsp. butter
-1 onion, cut in half and peeled
-2 cups chicken stock
-a few dashes of tabasco
-salt, to taste
-optional: 1 tsp. sugar

Method:
1. Put canned tomatoes (undrained), butter, onion, and a pinch of salt in a medium-sized pot. Bring everything to a simmer over medium-low heat. Reduce heat to low and cook, stirring occasionally, until the onions are very soft and the tomatoes are cooked down enough that the pot is dry when you scrape your spoon across the bottom. This will take at least 30 minutes, so you don’t have to watch it too carefully. If you’re dying to eat, you can turn the heat up to medium, but you’ll need to monitor and stir to keep things from burning.

2. Add chicken stock to the pot and use an immersion blender to blend the soup until it’s smooth. Add tabasco and salt to taste.

3. I think the soup is good with or without sugar, but if you want more of that nostalgic sweetness, add up to a teaspoon of sugar. Taste again, see what you think (add more salt or tabasco as you like – sugar will change the flavor slightly so you may want to adjust) and eat up.

*For a grown-up grilled cheese, get two slices of your favorite bread, butter one side of each slice, and grate up equal parts of sharp cheddar and gruyere cheese. Heat your pan on medium-low, put the bread in butter-side down, pile the cheese on both sides and wait for it to melt. When it’s melted, slap the two sides together (cheese in, obviously) dip it in your soup, and eat it.

  1. I still have random flash-backs about The Dark Crystal! Not sure I want to revisit it - especially after what you wrote about it :) And the soup... nothing better than a bowl of homemade tomato soup. I love the technique you used - so creative :)

    April @ Girl Gone Gourmet — March 13, 2015
    1. April I'm so glad to know there are more of us Dark-Crystal-exposed people in the world. We probably need to form a support group. Have you made the famous Marcella sauce before? It's so mild I thought it would be the perfect thing for a sweet-ish, creamless tomato soup.

      courtney — March 17, 2015
    2. reply
  2. This soup looks fabulous! Love the photos :)

    marla — March 18, 2015
    1. Thanks Marla! It's all about that bright red color and that obscene grilled cheese :)

      courtney — March 18, 2015
    2. reply
cancel reply

Roasted Sweet Potato Salad with Goat Cheese and Bacon

Roasted Sweet Potato Salad with Goat Cheese and Bacon

This is a substantial salad. Dinner-worthy, even. And yeah, it’s been done before on this here interweb, but have you made it yet? Because you should. You really should.

Roasted Sweet Potato Salad with Goat Cheese and Bacon

The flavors of this salad are so well-anchored in sweetness with the roasted root vegetables and balsamic dressing that it’s almost too much, but the bacon and goat cheese lend brightness and smoky-salty complexity that manage to keep it all very nicely balanced. It’s really a winning combination – one that you need to try if you haven’t already.

Roasted Sweet Potato Salad with Goat Cheese and Bacon

Roasted Sweet Potato Salad with Goat Cheese and Bacon
serves 3-4

Ingredients:
-1 lb uncooked bacon strips
-2-3 medium sweet potatoes, cut into cubes or slices
-3-4 shallots, peeled and cut in half (or one medium onion cut into wedges)
-a small roll of goat cheese (they are 3 oz, you’ll use about half a roll)
-1 small box or bag salad greens (spring mix, arugula, baby kale, spinach, whatever)
-1 Tbsp balsamic vinegar
-1 tsp honey
-1 tsp dijon mustard
-1 clove garlic, grated or minced
-2-3 Tbsp olive oil
-salt and pepper

Method:
1. Start by cooking your bacon on a baking sheet in a 350F oven for 20-30 minutes or until browned and crispy, stopping at least once to turn the pan.

2. Remove the bacon to a paper towel lined plate and set aside. Drain most of the fat from the baking pan, add sweet potatoes to the pan with salt and pepper, toss to coat the potatoes in bacon fat, and return the pan to the oven.

3. Roast sweet potatoes for 15 minutes, add your shallots or onions to the pan and return it to the oven for another 15-20 minutes or until the potatoes and onions are cooked through and nicely caramelized.

4. Combine balsamic vinegar, mustard, honey, and garlic in a small bowl with a whisk. Slowly drizzle olive oil into the vinegar while whisking to emulsify the dressing. Taste the dressing and add salt and pepper to your liking.

5. Assemble the salad with greens on the bottom, roasted veggies and bacon on top, followed by goat cheese, balsamic dressing, and a final sprinkle of salt and pepper (if you like).

The warm vegetables will wilt the tender greens, so assemble just before eating.

  1. Great recipe. Top marks, we really enjoyed this. Thanks for sharing. Simon

    plasterers bristol — August 5, 2015
    1. reply
cancel reply

Crispy English Roasted Potatoes

Crispy English Roasted Potatoes

Crispy potatoes are my kryptonite. I live for spuds that crunch so loud I can’t hear myself think, like twice-cooked Belgian frites, Utz ripple chips, and these English roasted potatoes. Cody lived in England for a bit before we met and told me about the potatoes they made with their Sunday roasts. I thought they sounded like more work than they were worth, and tried to replicate them by blasting raw potatoes in the oven until they turned to leather. I was a fool. I have since experienced properly crisp yet creamy English potatoes, no corners cut, and they are a revelation.

These potatoes are made in two steps. It’s a bit of work, but worth it. They’re also not so much roasted as fried in the oven but let’s not get hung up on semantic trifles. 

Crispy English Roasted Potatoes

The trick to creating such shattering crisp outsides is boiling the potatoes before you roast them. Then you do what Jamie Oliver describes as “chuffing up” the outsides of the potatoes by banging them around the pot until they’re, well, chuffed. I blogged about this once before, but with actual deep-fried potatoes and I have to say, oven-roasted potatoes are so much crispier, it’s not funny.

Crispy English Roasted Potatoes

The price you pay for such glorious potatoes is time. You have to give yourself at least an hour, maybe an hour and a half to get these properly done, so plan accordingly. They don’t re-heat very well, but they can be held in a warm oven for thirty minutes or so. I should also mention that they go quite well with steak.

Crispy English Roasted Potatoes

Crispy English Roasted Potatoes
Adapted from Jamie Oliver’s perfect roasted potatoes

Ingredients:
-large russet potatoes, at least one per person (preferably one and a half)
-2-3 tablespoons olive oil
-1/4-1/3 cup peanut oil (or other high smoke point oil)
-kosher or sea salt
-optional; black pepper, rosemary, thyme

Method:
1. Peel and cut potatoes into large chunks, about 6-8 pieces per potato, around 2×2 inches in size.

2. Put potato chunks in a large pot and cover with water. Season water with a good pinch of salt and bring to a boil slowly over medium-high heat.

3. While your potatoes are boiling, preheat your oven to 500F.

4. When the potatoes are not quite cooked through (but quite soft on the outside, about 15 minutes for such large pieces), cover the pot with a slightly offset lid and drain the water from the pot. Holding the lid tight, shake the pot once or twice to rough up the surface of the potatoes.

5. Pour olive oil over potatoes and gently stir them (preferably with a rubber spatula) to coat with oil.

6. Pour peanut oil in a rimmed baking sheet or roasting pan and let it preheat in the hot oven for 2-3 minutes.

7. Remove the baking tray from the oven and pour your potatoes into the hot oil. It will sizzle – that’s good. Spread the potatoes out in a single layer, sprinkle with salt, and put them in the oven. Do not crowd the pan – if your potatoes are piling on top of each other, get out another pan and do two batches.

8. Roast the potatoes for about 15 minutes, then take them out and squish them slightly with the back of a metal spatula. This increases the flat surface area and means extra crunch.

9. After squishing the potatoes, return them to the oven for another 15 minutes, then take them out and flip them over. The first side should be gorgeously brown.

10. Add pepper, rosemary, or thyme (if you’re using it, though if these are your first crispy roast potatoes I’d leave simply salted) and return the potatoes to the oven to roast for a final 10-15 minutes or until they are nicely brown on both sides and very crispy. If for whatever reason they aren’t as brown as mine in the photo, leave them in the oven a few more minutes. Then just taste them, add more salt if necessary, and serve.

  1. making these tonight and i can't wait! i'm also a sucker for crispy potatoes. but i'm pretty sure my version of crispy potatoes is the leathery hard ones you described in your earlier years, haha. wa wa waaaaa

    miranda — March 5, 2015
    1. Yay! You'll have to tell me what you think! And like I said in the post, if they aren't brown enough, give 'em more time :)

      courtney — March 5, 2015
    2. reply
  2. My boyfriend is English and LOVES these kinds of potatoes. We made them together for the first time this past Christmas and I agree that they are totally worth the hassle and time - super crispy on the outside and soft and fluffy on the inside. He had talked about them forever, but it wasn't until we made them that I understood why he loves them so much. Yours look amazing!

    April @ Girl Gone Gourmet — March 6, 2015
    1. Thanks April! It pains me to admit when my husband is right about cooking (MY domain), but this was the best bit of humble pie ever. Brits know their potatoes!

      courtney — March 9, 2015
    2. reply
  3. These look sooo amazing! Bring on the crisp. I'm coming off a weekend of french fry making (I just got a new mandoline) and getting the perfect potato crisp is easier said than done. Your blog is lovely, Courtney! Your brother-in-law Jordan sent me your way. Keep up the awesome work!

    Karen @ The Food Charlatan — March 10, 2015
    1. Thanks Karen! And french-fry making is a beast. My first attempt left me dumping a smoking hot, nigh-to-exploding pot of oil out in my backyard. A thermometer eventually saved me, but I am forever scarred. Love your blog btw!

      courtney — March 10, 2015
    2. reply
  4. These look sooooooo gooooood! I want some right now!

    Amy — March 11, 2015
    1. reply
  5. These were incredible! Thanks for the great recipe. We will absolutely make this over and over again.

    Sarah — August 6, 2015
    1. reply
  6. I learned to make these from my English son-in-law; he doesn't do the 'squishing' part, but I bet that makes them even better! (And he calls it 'roughing them up', but 'chuffing' is so very descriptive...)

    margaret — November 28, 2015
    1. The English are onto a good trick with the chuffing, aren't they?

      courtney — December 6, 2015
    2. reply
cancel reply

Pan-Seared Butter-Basted Steak

Pan-Seared Steak

Sometimes there needs to be meat. And sometimes grilling just isn’t going to happen.

Pan-Seared Steak

It took me more than a few tries to perfect the art of indoor steak, but my struggle was well worth it. Grills are wonderful in their season, but what a pan-seared steak lacks in flame-kissed smokiness, it makes up for in pristine caramelization. Then there’s the fact that you can baste a pan steak in butter – which is no small matter.

Pan-Seared Steak

About butter-basting a steak: it’s not the same as cooking steak in butter. Steak needs high heat and butter has a low smoke point, so cooking a steak 3-5 minutes per side in butter is a mistake. Searing an oil-coated steak in a dry cast iron pan and then nudging the heat down and adding butter at the end (with a few flavor enhancers) gives you a deeply caramelized steak, flavor infused brown (not burned) butter, and a virtually smokeless kitchen. This is the one true pan-seared steak.

Pan-Seared Steak

The One True Pan-Seared Butter-Basted Steak

Ingredients:
-your favorite cut of steak
-peanut oil (or some other high smoke-point cooking oil)
-sea salt or kosher salt
-fresh cracked black pepper
-2-3 tablespoons butter
-1-2 cloves garlic, crushed but whole
-a few sprigs of thyme (or some other woody herb like rosemary)

Recommended equipment:
-cast iron skillet or griddle
-meat thermometer

Method:
1. A half hour before you plan to cook your steak, take it out of the fridge and let it rest on a plate at room temperature. Steak cooks quickly, so use this time to prepare your sides so you will be ready to serve a few minutes after your steaks come off the heat.

2. 4-5 minutes before you are ready to cook, pre-heat a cast iron pan over medium heat (if you don’t have cast iron, regular shiny metal is ok but won’t need to preheat more than 2 minutes. Avoid nonstick because it’s not made for high temperatures). Make sure your pan is large enough to accommodate the steaks you plan to cook. You’ll need about a 2 inch buffer between the steaks (if you’re cooking multiples) for a proper sear. If your pan is too small, use two or (if you must) cook the steaks one at a time.

3. About a minute before you’re ready to cook, turn your pan up to medium-high heat (high if you have an electric coil stove) . Coat your steaks in oil and season liberally with salt and pepper.

4. Put your oiled and seasoned steaks in your hot pan and don’t touch them for at least 3-5 minutes (more if your steaks are very thick). When they are properly seared, they will lift off the pan very easily. Flip them once and let them cook another 3-5 minutes.

5. When your steaks are nearly done, turn the temperature to medium-low and drop in the butter, thyme, and garlic. Tilt the pan and scoop the melted butter over the steaks to baste. Let the steaks cook in the butter until they reach the temperature you like. This timing will vary hugely depending on the shape of your steaks and how you like them done, so if you have a thermometer, use it. If you don’t, you can make a small slit in the fattest part of the steak to check it’s doneness.

6. When the steak is cooked to your liking, remove it to a fresh plate to rest for at least 5 minutes, pretty-side up to preserve the caramelization. Use the last five minutes of rest time to set your table or finish up making a side dish. Then get ready to eat the greatest indoor steak of your life.

  1. You did that steak so well, it looks like filet mignon!

    rick — March 13, 2015
    1. Thanks Rick! It's a tenderloin steak, so almost a filet mignon, just not quite as pretty.

      courtney — March 17, 2015
    2. reply
  2. This is now my go-to indoor steak recipe, Have made it a few times now, changing spices etc and it never fails. Thanks!

    Katharine — April 12, 2015
    1. Katharine! You made my day with that comment. I'm so glad it works for you. Thanks for the return and report!

      courtney — April 12, 2015
    2. reply
  3. Using this tonight, finally a solid indoor steak recipe! can't wait to see how this turns out!!

    Kristen — March 5, 2016
    1. Thank you Kristen! I hope it works for you! If you need any help troubleshooting, let me know.

      courtney — March 14, 2016
    2. reply
  4. We struggled to find a steak recipe that both the adults and kids enjoyed, but this one really makes everyone's mouth water. Even my pickiest eater LOVES this steak, and requests it whenever the word "meat" is mentioned. XD I don't see myself making steak any other way for quite a long time, if ever!

    Bonnie — March 5, 2016
    1. Thank you Bonnie! I'm so glad you like the recipe! I think so many people default to grilling when they think steak (which is delicious), but pan-seared steak is something special in my opinion, especially with butter.

      courtney — March 14, 2016
    2. reply
  5. I've never been able to cook steak properly - this recipe is the first time I've nailed it. So good! Thank you!

    Bobo — April 4, 2016
    1. So glad it worked for you! Thanks for giving the method a try!

      courtney — May 22, 2016
    2. reply
  6. very nice riff on Momofuku Ssam Bar's large format steak.

    Blain — April 12, 2016
    1. I did see David Chang's chef friend making a giant steak this way on the "Mind of a Chef" documentary series (which I LOVED), but to be fair I've seen steak done this way for ages, both on TV and in culinary textbooks. A good method is a good method though!

      courtney — May 22, 2016
    2. reply
cancel reply