Slow-Cooker Summer Corn Chowder

Slow-Cooker Summer Corn Chowder

I’ve written about the awesomeness of this corn chowder in the past, because it showcases the sweetness of summer corn in a way that’s rich without being heavy and about as summer-appropriate as a chowder can possibly be. Now that I’m on a “slow cookers for summer” kick, I thought this recipe would be perfect to adapt.

Slow-Cooker Summer Corn Chowder

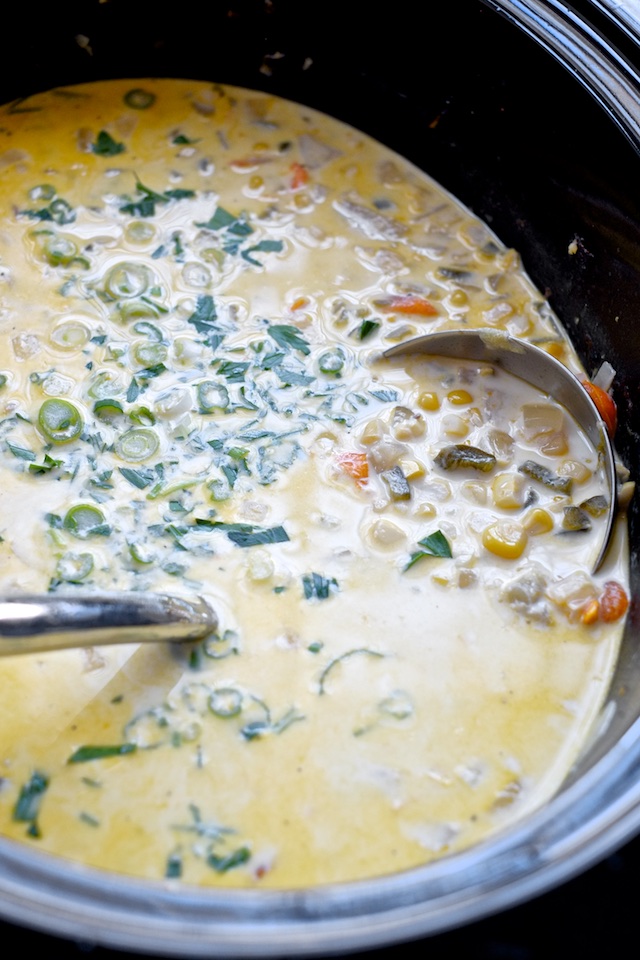
It’s a surprisingly easy chowder to put together. A bit of chopping, some corn cob scraping, a turn in the slow cooker to extract some liquid from all the summer produce, and milk to finish. I have to say I recommend using yellow tomatoes if you can find them because red tomatoes give the chowder a weird pinkish hue that really bugs me, but if it doesn’t bug you, feel free to go with whatever you can find.

Do not skip the bacon and green onion topping. This chowder is definitely on the sweet side and the bacon and green onion lend sharpness and depth that are really critical to keeping things balanced.

Slow-Cooker Summer Corn Chowder


Slow-Cooker Summer Corn Chowder
adapted from Food 52

Ingredients:
6-10 strips bacon
5-6 ears fresh corn
1 medium onion
1 poblano pepper
1 jalapeño pepper
1 celery rib
3 medium yellow tomatoes
2 medium waxy potatoes
1 tsp salt
1 bay leaf
1 cup half and half
2 cups milk
more salt and black pepper, to taste
optional: cayenne or tabasco
parsley and sliced green onion, for garnish

Method:

1. Start by cooking your bacon. The point of crock pot corn chowder is to keep the kitchen cool, so I recommend using your microwave unless you already have some cooked bacon on hand. I usually start a plate of raw bacon in the microwave for 2 minutes on high, stop and pour any liquid from the plate into the slow cooker, then cook for 30 seconds and check, another 30 and check, two or three times until the bacon is crispy. Pour any remaining fat into the slow cooker. Drain the bacon on paper towels, crumble and set aside.

2. Cut the corn from the cobs into a bowl (it helps to use a small bowl set upside down inside of a large bowl to rest the cobs on while you slice) and use the back of your knife to “milk” the cobs of all the corny goodness. Pick through the corn for any stray silks and add them to the slow cooker.

3. Dice your onion, poblano, jalapeño, celery, tomatoes, and potatoes and pile them in the slow cooker. Add your salt, and bay leaf and black pepper, cover and cook on low for 2 1/2 to 3 hours.

4. When the potatoes are cooked and there is a good amount of liquid in the bottom of the pot, add the milk and half and half. Taste for seasoning. This soup is pretty darn sweet, so a dash of cayenne or tabasco is welcome.

5. Garnish with green onion (super important for flavor balance) and parsley (slightly less important but still tasty) and top with crumbled bacon.

  1. So for your jalapeño do you like to use hot or mild ones? I love corn chowder and also any kind of creamy soup with poblanos in it, i just don't want it to end up being too spicy if i put in a really hot jalapeño. But then the milk. what do you think?

    miranda — July 29, 2016
    1. Honestly, I don't have any idea how to tell the difference between hot and mild jalapenos, so for me it's a crap shoot! What is the secret? I'd use a mild one since the poblanos tend to carry a little heat themselves.

      courtney — August 17, 2016
    2. reply
cancel reply

9 Summer Recipes for the Slow Cooker

Summer Recipes for the Slow Cooker

You guys, I don’t know how I didn’t realize this before, but slow cookers are summer food dream-weavers. Maybe it’s because they’re so commonly associated with stews and soup, which are decidedly un-summer, but if you think about it, the slow cooker’s potential for summer cooking is even more amazing than winter cooking. Seriously: slow cookers don’t heat up the kitchen the way stovetop or oven cooking does (praise be), and they encourage hands-off food prep which means more time outside enjoying the weather for you and your family. Dust ’em off and get cooking! But slowly.

1. I assert that Thai curry is aseasonal. This basil chicken coconut curry from The Food Charlatan looks particularly awesome.

2. Tacos are a summer classic and these poblano honey lime chicken tacos from Cooking for Keeps deserve their own outdoor dinner party with friends.

3. Nachos are appropriate any time of year. How Sweet Eats does a slow-cooked carne asada version that looks like something I need.

4. Or how about some slow-cooker adobo chicken burrito bowls from Creme De La Crumb?

5. Baked beans are a barbecue staple. Don’t make yours on the stove or in the oven this time. Bust out that countertop summer savior and keep the heat outside.

6. Sweet corn is at it’s peak of deliciousness in the summer, take advantage by making some slow-cooker creamed corn with fresh corn.

7. I don’t know about you, but I feel like it’s never too hot for chocolate lava cake. Maybe with a scoop of vanilla ice cream on top. Especially if you can make it in the slow cooker.

8. Pulled pork is a natural fit for slow cooking, and it’s pretty much all anyone wants in the summer anyway.

9. And raise your hand if you had no idea you could make ribs in your crock pot. Changing lives one recipe at a time.

I’ve got a few slow-cooker summer recipes of my own in the works for you over the next weeks, so stay tuned!

cancel reply

Whole-Wheat Pasta Salad with Honey Mustard Greek Yogurt Dressing, Brie, and Bacon

Whole-Wheat Pasta Salad with Honey Mustard Dressing, Brie, and Bacon

Whole grains are good for you. Or at least better for you than their simpler, refined-carb counterparts. But swapping whole wheat pasta for regular pasta in a lot of dishes can be kind of disappointing. Whole wheat pasta has a nuttier, heavier flavor that can overpower lighter tomato sauces and mild cheese sauce, so you can’t just swap it out willy nilly and expect it to taste great every time.

Because of my bout of gestational diabetes I’m all about complex carbs lately, so I wanted to create a sauce that would compliment the flavor of whole wheat pasta rather than fight with it. I know nutty and sweet and spicy flavors are good together, so I went with honey mustard. I also know that pasta salad can get really unhealthy really quickly, so I decided to create a creamy dressing around greek yogurt instead of mayo. The result is maybe my new favorite pasta salad, packed with flavorful ingredients (oh hai bacon, nice to see you brie) and decently nutritious too.

Whole-Wheat Pasta Salad with Honey Mustard Dressing, Brie, and Bacon

Whole Wheat Pasta Salad with Honey Mustard Greek Yogurt Dressing, Brie, and Bacon
serves 6-8

Ingredients:
1 lb box whole wheat fusili or rotini pasta
3/4 cup whole milk greek yogurt
3 Tbsp dijon mustard
3 Tbsp honey
3 Tbsp olive oil
2 small cloves garlic, grated or minced
salt and black pepper
2-3 Tbsp parsley, minced
2-3 Tbsp green onion, sliced
about 1/2 cup diced raw tomato (or more)
about 1/2 cup brie cheese, cubed (or more)
2 small, cooked chicken breasts (grilled is nice, but any will work)
6 strips bacon, cooked and crumbled (or more!)

Method:

1. Cook pasta according to package directions. Don’t forget to salt the pasta water well.

2. Mix up the dressing by combining yogurt, mustard, honey, olive oil, garlic, and salt and pepper. Taste for seasoning and add more salt and pepper as necessary.

3. Mince parsley, slice onions, dice tomato, brie, and chicken, and crumble bacon.

4. Toss cooked pasta with dressing, parsley, onion, tomato, brie, chicken, and bacon. Taste again for seasoning and serve.

cancel reply

Sous Vide Grilled Pork Chops with Garlic Rosemary Butter

Sous Vide Grilled Pork Chops

Pork and fire is such a good flavor combination, but the high heat of the grill makes cooking pork tricky, since most people tend to be afraid of undercooking pork and overcooking turns lean pork into shoe leather. How do we get the best of both worlds? Sous vide.

I’ve combined pasteurizing times with the optimal medium-pork temperature for what I think is the best pork chop you can get at home or in a restaurant. A few hours in a water bath followed by a very fast sear on the grill and you have juicy, germ-free, flame-kissed pork chops. It’s a thing of beauty. Gild the lily with garlic-rosemary butter.

Sous Vide Grilled Pork Chops


Sous Vide Grilled Pork Chops with Garlic Rosemary Butter
one pork chop feeds 1-2 people depending on appetites and cuts

Ingredients:
thick cut, bone-in pork chops (about 1 1/2 inches thick)
salt and pepper

Garlic Rosemary Butter (per chop):

2 Tbsp butter
1/2 small clove garlic, grated (or a dash of granulated garlic)
1 tsp fresh rosemary, chopped
black pepper 

Method:

1. Set up your sous vide machine on the edge of a pot or heat-proof vessel. Fill the pot with water and set the circulator for 135F-140F.

2. While the water bath is heating, season your pork chop well on all sides with salt and pepper and transfer it to a zip-top freezer bag. Seal the top except for a small part of one corner, and lower the bag into the water bath until all the air has been allowed to escape through the gap in the top. Seal the bag and drop it in the water bath for 3-4 hours.

3. While the pork chop is cooking, mix together butter, garlic, rosemary, and black pepper and set aside.

4. When the pork chop is finished cooking, preheat your outdoor grill or indoor grill pan over medium-high heat. Grill the pork chop until well-marked on both sides (just a minute or two) and serve topped with rosemary butter.

cancel reply

Sous Vide Grilled Burgers

Sous Vide Grilled Burgers

Burgers are awesome and American and, sadly, one of the more risky things to eat at any temperature under “well-done”. Germs that contaminate beef tend to reside on the outside of the meat, so steak that gets seared on both sides but is medium-rare in the middle is significantly less risky to eat than ground beef, which allows all the germs to get mixed into the center.

Sous Vide Grilled Burgers

But you like bloody burgers! I get it. A burger is so much more a burger when it’s juicy and sloppy and red in the middle, but I have to admit it freaks me out a little. So I harness the power of sous vide to pasteurize my burger patties while keeping them a perfect, drippy, obscene medium rare. Pretty cool huh?

Sous Vide Grilled Burgers


Sous Vide Burgers
adapted from Serious Eats (my favorite food website) with pasteurization reference to my favorite sous vide chart here

Special Equipment:
sous vide machine
zip top quart sized freezer bags
outdoor grill or indoor grill pan

Ingredients:
ground beef, around 1/3 pound per person
salt and pepper
American cheese, sliced (from the deli, not the wrapped “singles”, 1-2 slices per person)
tomato (1-2 slices per person)
red onion, thinly sliced (a few rings per person)
lettuce (one or two leaves per person)
mayo
ketchup
pickle spears to serve on the side or coins to put on top
burger buns, one per person

Method:

1. Get the sous-vide machine clamped to the side of a large pot or other heatproof vessel. Fill the pot with water and set the temperature to 131F-137F for a “medium” burger. I set mine to 131 for the burger pictured. Crazy how red it looks, right? That’s because ground beef gets more oxygen than whole cuts of meat, so it will always be redder. No need to freak out. 131F is really the lowest temperature you can use if you are trying to pasteurize a patty this thick. Any lower and the length of time required for the center of the patty to be sufficiently heated through would put us in the “danger zone” for food safety times. As long as you are above 131F you can let those fatty patties sit in their water bath for as much as 4 hours without losing quality.

2. While your sous vide bath preheats, get your beef divvied up into nice, thick patties (up to about three centimeters or one inch) that are just a smidgen larger than the buns you plan to use. It’s not worth using the sous-vide process if your burgers are much thinner than 3/4 inch, so keep that in mind. Salt and pepper the outsides and gently lay them in your freezer bags.

3. Seal the bags up most of the way, leaving a tiny corner open on one side. Remove the air from the bag by lowering it into the hot water bath and allowing air to escape from the open corner. When as much of the air as possible has been removed, seal up the last corner.

4. Arrange your bags in your water bath and clip the sides of the bag to the pot if necessary to keep them bumping around too much. Cook for 3-4 hours to pasteurize fully.

5. When the patties are done, let them rest for ten minutes while you preheat your grill (or indoor grill pan) over medium-high heat.

6. Cook your patties until well-marked on one side (maybe 60-90 seconds), flip once, top with cheese, and cook until marked on the other side. Remove to a plate and get ready to assemble.

7. Toast burger buns if you like and layer on lettuce, cooked burger patties with melted cheese, onion, tomato, ketchup, and mayo. Add pickles if you like. Eat.


  1. I can't believe we haven't tried burgers with our sous vide! Yum!

    Courtney — July 4, 2016
    1. reply
cancel reply