Creamy Sesame Dressing

Creamy Sesame Dressing

AKA the best salad dressing you’ve never had. Or at least I had never had it, until Cody and I went to Japan for that NASA thing we did, and then I had it all the time. The little hotel that hosted us for our four-month Tanegashima stay gave us these crazy “western” breakfasts that translated to a veritable grab-bag of western foods often including an egg, some kind of breakfast-y meat, a little orange or chunk of banana, a slab of toasted Japanese white bread with margarine and jelly, and a green salad or a few pieces of steamed broccoli, over which we poured this dressing. Salad and broccoli for breakfast!? With this dressing, it was totally acceptable.

Creamy Sesame Dressing

I kind of fell in love with sesame everything while I was in Japan, so I bought myself one of these little sesame grinding bowls for 300 yen (that’s about three bucks US) and I have an inordinate amount of fun listening to the little seeds pop and huffing that sesame scent while I make sesame foods. It’s intoxicating. If you are at my house while I’m grinding sesame seeds I will shove the bowl in your face and make you share this joy with me. And you will appreciate it, or else. For people who are less freaky about sesame things, a spice grinder or food processor will do the job (though you’ll need to use a slightly different method with a processor…I’ll explain later).

Creamy Sesame Dressing

The best thing about this dressing is that it tastes amazing with and on everything. We were served it with 90% of the salads we ate in Japan, along with most of the steamed and stewed vegetables, shabu shabu meats, stir fry, etc. Lots of restaurants just had little bottles of it sitting on the table next to the soy sauce and togarashi. As awesome as the bottled stuff is, homemade is better (surprise, surprise). It’s also really easy to make, so I recommend that you do.

Creamy Sesame Dressing


Creamy Sesame Dressing
makes almost 1 cup of dressing

Ingredients:
-3 Tbsp raw sesame seeds
-1/2 cup mayo
-2 Tbsp rice vinegar
-1 Tbsp soy sauce
-1 Tbsp toasted sesame oil
-2 tsp sugar
-1/4 tsp white pepper (optional and non-traditional, but I like it)

Method:

1. Toast your sesame seeds in a glass bowl in the microwave. Start by microwaving for one minute, then stop and stir, another minute, then stop and stir. After the initial two minutes, microwave in 30 second bursts, stirring between, until the seeds are slightly darkened in color and very awesomely fragrant (mine took about 4 30 second intervals)

2. In a bowl (or the bowl of your food processor) add mayo, rice vinegar, soy sauce, toasted sesame oil, sugar, and pepper if using. Whisk or pulse just to combine.

3. If you are using a spice grinder or sesame grinder or mortar and pestle, grind the toasted sesame seeds until they are mostly powdered with just a few whole seeds left, then mix into the dressing by hand. If you are using a food processor just add the whole seeds to the dressing and pulse until the sesame seeds are chopped and incorporated.

4. Serve over a green salad, with broccoli, on a sandwich…use your imagination.


Later this week I’ll post a really tasty steak salad that features this dressing, so stay tuned!

  1. […] Ingredients: -4-6 raw wonton wrappers (or you can use store bought crispy wonton strips) -2 Tbsp neutral flavored oil, divided (like sunflower or canola) -1 steak of your choice -about 4 cups shredded romaine -about 2 cups shredded lacinato kale -about 1 cup shredded cabbage (green or red) -1 carrot -about half a small cucumber -1 tomato -3-4 scallions -1 avocado (do not forget) -1/4 to 1/3 cup sesame dressing […]

    Steak Salad with Creamy Sesame Dressing | Sweet Salty Tart — December 17, 2015
    1. reply
cancel reply

My Favorite Food Gifts to Make and Give

My Favorite Food Gifts to Make and Give - Bacon Jam

I love food gifts. I love the festive mood I’m in when I make them, I love giving them, and I especially love getting them. They are affordable, thoughtful, low-waste, low-pressure, and delicious. These are the very best ones I’ve made and documented over the years.

First up, (pictured above) bacon jam! It’s not cookies! It’s savory, snacky and, paired with a tree shaped wedge of herby cheese and some homemade crostini, kinda fancy.

My Favorite Food Gifts to Make and Give - Hot Fudge Sauce

My family’s famous hot fudge sauce. A little jar of this with a pint of really good ice cream and maybe a candy cane and you’re just the best little elf ever.

My Favorite Food Gifts to Make and Give - Millionaire Shortbread Bars

Millionaire shortbread bars. This one is slightly more labor intensive, but it makes a huge batch and they’re so rich, a few go a long way.

My Favorite Food Gifts to Make and Give - Brown Butter Vanilla Bean Crispy Treats

I stuff an entire batch of these salted brown butter and vanilla bean crispy treats into a 9×9 pan for impressively tall treats.

My Favorite Food Gifts to Make and Give - Naked Roasted Almonds

Naked roasted almonds. I know you can go buy fancy olive-oiled marcona almonds, but these are cheaper and they taste soo amazing when you roast them yourself. Add your favorite spices or roll them in cinnamon sugar, and gift them in a pretty jar.

My Favorite Food Gifts to Make and Give - Maryland Style Hot and Spicy Crab Dip

I’d pick up a few mini casserole dishes and fill them with this Maryland style hot and spicy crab dip. Along with a good baguette, this is an incredible holiday snack.

My Favorite Food Gifts to Make and Give - Ultimate Party Mix

Ultimate party mix. Customize your pretzel to cereal ratio, make it as spicy as you want, and (if you’re me) throw in a can of french fried onions. Bag it up, tie it with some stripey baking string, and you’re set!

  1. i'm reading this post past the holiday-giving season, so I think I am just going to make all these and keep 'em for myself! yum!

    emily — January 4, 2016
    1. reply
cancel reply

Egg In A Grilled Cheese Purgatory Hole

Egg In A Grilled Cheese Purgatory Hole

One of my favorite restaurants does an awesome “eggs in purgatory” for brunch, which is normally just eggs poached in spicy tomato sauce with some toast. Rather than trying to poach eggs to order in pans of tomato sauce, they speed up the cooking by serving it with the egg grilled into a slab of buttered bread and a puddle of very, very spicy tomato sauce on top. It is an improvement on the original, I think.

Egg In A Grilled Cheese Purgatory Hole

The fact that everyone is into putting eggs on top of and inside of everything lately made it easy for me to stumble on “grilled cheese egg in a hole” somewhere on the interweb and, naturally, I was inspired to “purgatory” it.

Egg In A Grilled Cheese Purgatory Hole

Crispy grilled cheese with a runny egg inside and spicy tomato sauce underneath sort of defies categorization. You can eat it for breakfast, brunch, lunch, dinner, or midnight snack, and nobody will judge you. Not for the timing anyway.

I tried not to eat this entire thing for lunch after I finished taking photos of it, but I did not succeed. At not eating it. All.

Egg In A Grilled Cheese Purgatory Hole


Egg In A Grilled Cheese Purgatory Hole
makes 2 servings

Ingredients:
-about 2 cups very simple tomato sauce (I recommend Marcella’s recipe, but any simple tomato sauce you like to put on pasta works )
-1/2 to 1 tsp crushed red pepper (depending on how spicy you like it)
-1 clove garlic, minced or grated
-4 slices of white or sourdough bread
-butter, for the outsides of the bread
-about 1 1/2 cups sharp cheddar cheese, grated
-a few tablespoons of parmesan cheese
-2 eggs
-salt, to taste

Method:

1. Heat your sauce in a saucepan over medium low heat. I like to use a very simple recipe for this, with not much more than tomatoes, butter or olive oil, and some onion. You can use a store bought tomato pasta sauce if you want, but choose something simple, without any weird meat added and minimal herbs (I think a little basil is fine). Add crushed red pepper and garlic to the saucepan, taste it and add salt if needed (it should be spicy! and well seasoned), and lower the heat to keep the sauce warm while you make the sandwiches.

2. Preheat a nonstick pan over medium-low heat. Grate your cheddar and butter the outsides of the slices of bread. After buttering, lay the buttered sides of the bread down and pile as much cheddar as you can fit with a sprinkle of parmesan on one side of each sandwich. Lay the second slice on top, butter side out.

3. With a round biscuit cutter or knife, punch holes in the center of each sandwich, keeping the punched circles in tact.

4. Carefully place your sandwiches in the pan (and the circles too!), buttered sides out. Cook the sandwiches on one side until the bread is nicely golden brown. Carefully flip the sandwiches to cook on the other side.

5. While the second side of the sandwich is browning, crack an egg into the center of each sandwich and top it with a little sprinkle of salt.

6. When the egg is well set on one side and the sandwich is nicely browned, very (very) carefully flip the sandwich over to finish cooking the egg on the other side. It helps to shake the pan a bit to make sure the egg isn’t stuck before you flip. Use a wide spatula for the flip and be as quick as you can to avoid breaking the yolk.

7. While the egg is finishing cooking, prepare two plates with a scoop of tomato sauce. Once the egg is set on both sides but runny in the middle, transfer it from the pan to your pre-sauced plate.

8. Garnish with more parmesan and an extra sprinkle of crushed red pepper. Eat with abandon.

  1. mmm...my mouth is watering...Ty would love this too

    courtneyh — December 9, 2015
    1. It's bangin' if I do say so myself :)

      courtney — December 15, 2015
    2. reply
cancel reply

Thanksgiving Sandwich Showdown

Thanksgiving Sandwich Showdown

Thanksgiving is fun, but it’s kind of an overwhelming affair. One that requires organization and preparation and pushing carts through crowded aisles hunting for supplies. It’s work. I’m lucky enough to live near family and we are splitting up the various duties, but it’s still a lot.

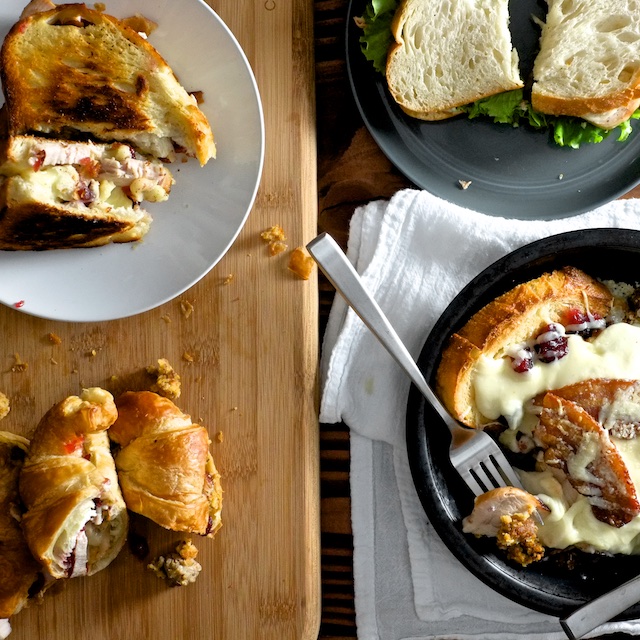
That’s why the day after Thanksgiving is so fun. There is sooo much amazing food left in the fridge, nobody needs to cook. The work is done. Everyone can just wander to the kitchen, heap up a plate, and get back to vegetating, watching Christmas movies, or napping. But it’s also kind of fun to play with the food a bit, stacking up Thanksgiving frankenwiches with different flavor combinations. I got a jump on the experimentation and made four versions (in no particular order) for your consideration. You are welcome.


#1 The Traditional Turkey

Thanksgiving Sandwich Showdown

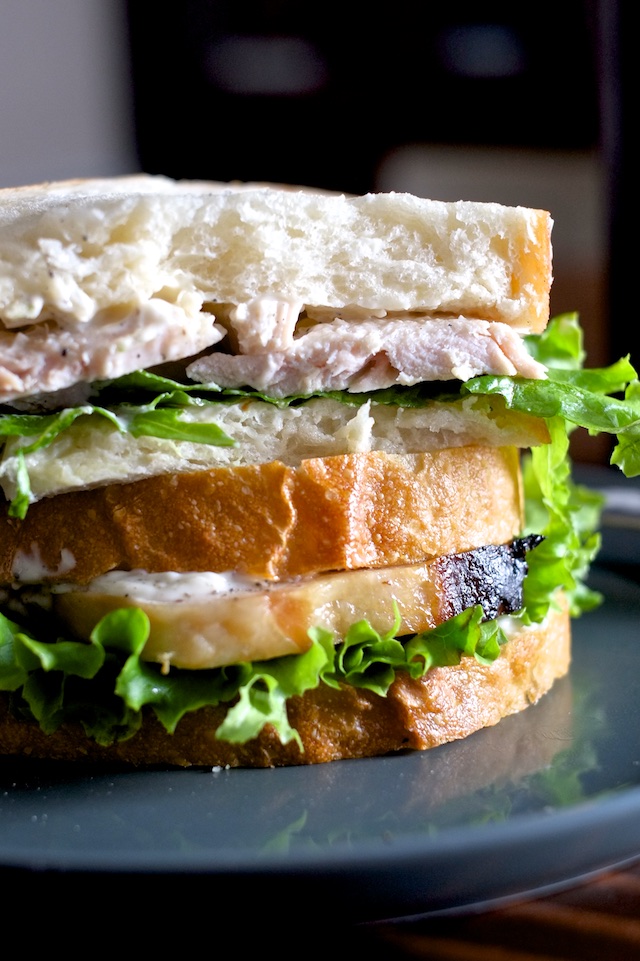
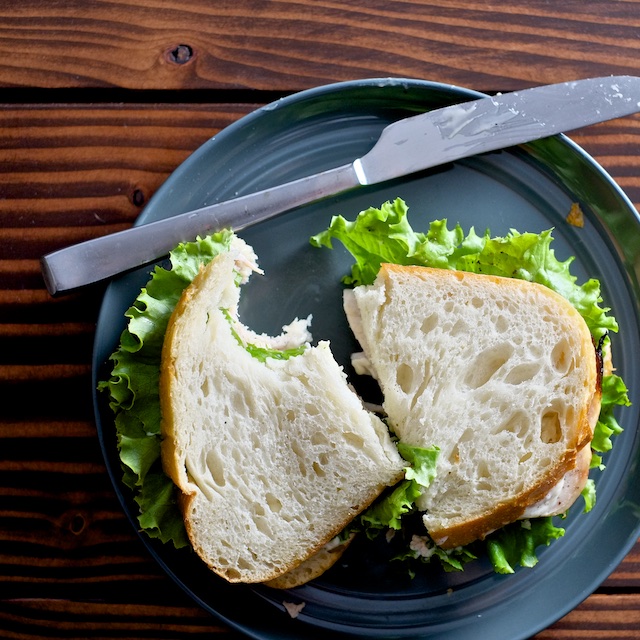
This is the sandwich I grew up making at 11:50pm on Thanksgiving, a good six or seven hours after the main event. It’s dead simple, and pretty much riding on nostalgia for me, but when the turkey is good, I like to let it shine with nothing but lettuce for crunch (iceberg if I’m at my grandparent’s house), lots of Hellman’s mayo, turkey, a pinch of salt, and a ton of fresh cracked pepper from my grandparent’s old wood pepper mill that grinds really unevenly. Some good soft bread, whole thing sawed in half at a sloppy diagonal with a butter knife and eaten standing at the kitchen counter. That’s it. But it really does taste good too, in a very straightforward kind of way.

Ingredients:
-soft sandwich bread
-leftover turkey
-lettuce, leaf or romaine or iceberg (or whatever)
-lots of Hellman’s mayo (or your preferred brand)
-a pinch of salt and lots of fresh cracked black pepper

Method:
1. Spread too much mayo on both slices of bread. Cover with cracked pepper.
2. Layer in fresh lettuce and turkey and a pinch of salt.
3. Eat standing at the counter, off a paper towel, or sitting in a chair while watching tv.

Thanksgiving Sandwich Showdown


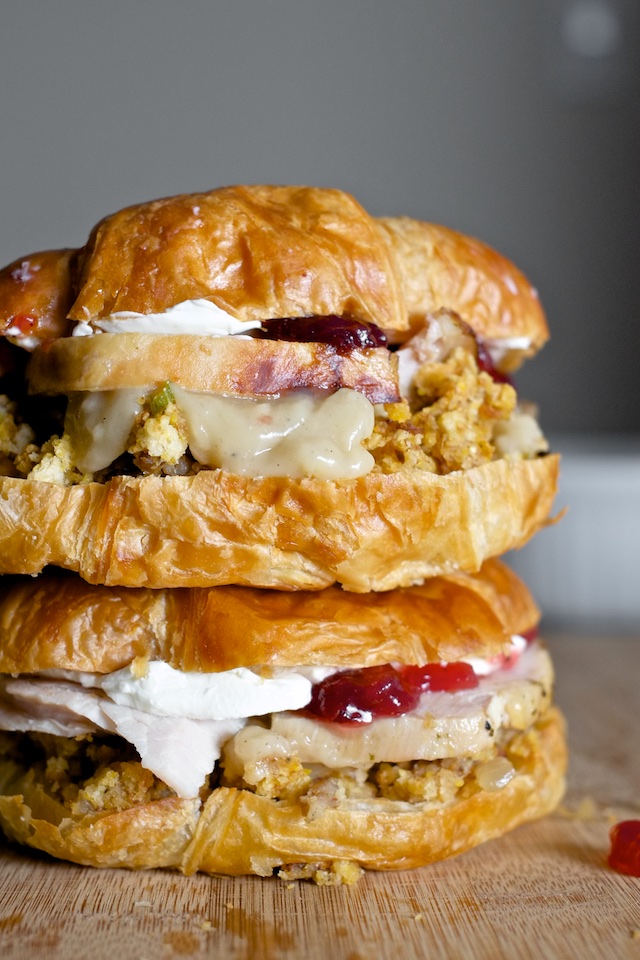
#2: Cranberry Cream Cheese Thanksgiving on a Croissant

Croissant and Cream Cheese: Thanksgiving Sandwich Showdown

The idea for this sandwich was stolen from my friend Tiffany. Last year I posted an Instagram of my after-thanksgiving sandwich stack and she commented “we do that too, but with cream cheese and croissants” and I was like: “obviously, you’re right”.

This beast turned out to be my favorite flavor-wise. It has to be assembled thusly for optimal structural integrity: first split and toast a store bought croissant, then pile stuffing on the bottom half, followed by a dollop of gravy (I leave it cold because it stays together better, but if jiggle bothers you, by all means heat it up) then a slice or two of turkey, some cranberry sauce, and on the top half, cream cheese. Finagle the two sides together and it’s pretty hard to beat.

Ingredients:
-store bought croissants
-cream cheese
-leftover cranberry sauce
-leftover stuffing
-leftover gravy
-leftover turkey

Method:
1. Split croissants in half with a bread knife and toast them.
2. On the bottom half layer stuffing (warm if you want), gravy (I go cold for this, but warm is good too), sliced turkey, and cranberry sauce.
3. On the top half spread cream cheese. This is a little tricky because the croissant is really delicate and the cream cheese requires a bit of brute force to spread around, so swipe it on in blobs if it’s cold and stubborn. I like it served with a couple of clementines.

Croissant and Cream Cheese: Thanksgiving Sandwich Showdown


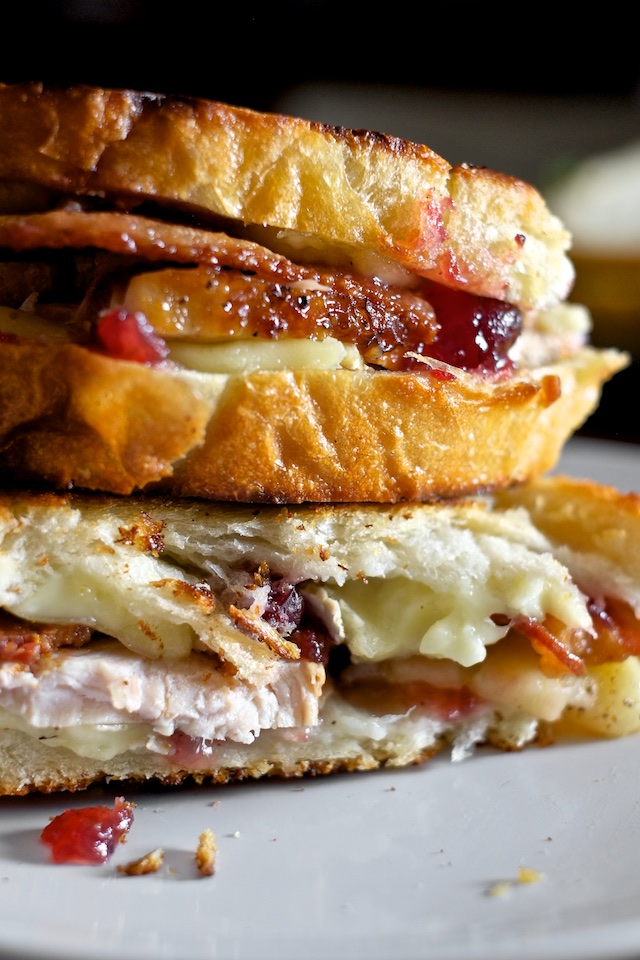
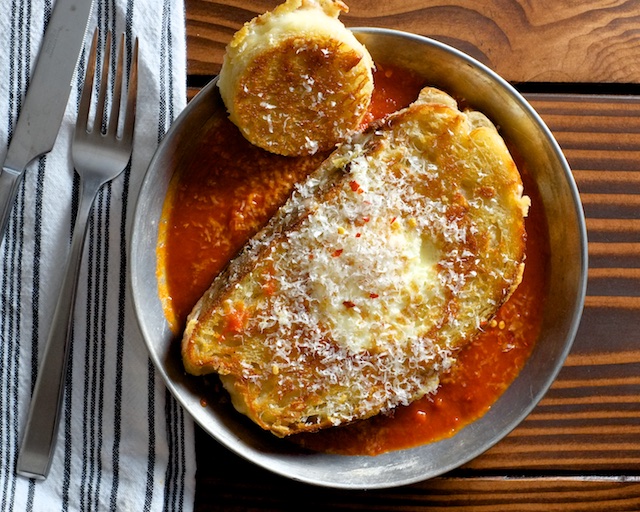
#3: The Turkey Cranberry Thanksgiving Hot Brown

Turkey Cranberry Hot Brown: Thanksgiving Sandwich Showdown

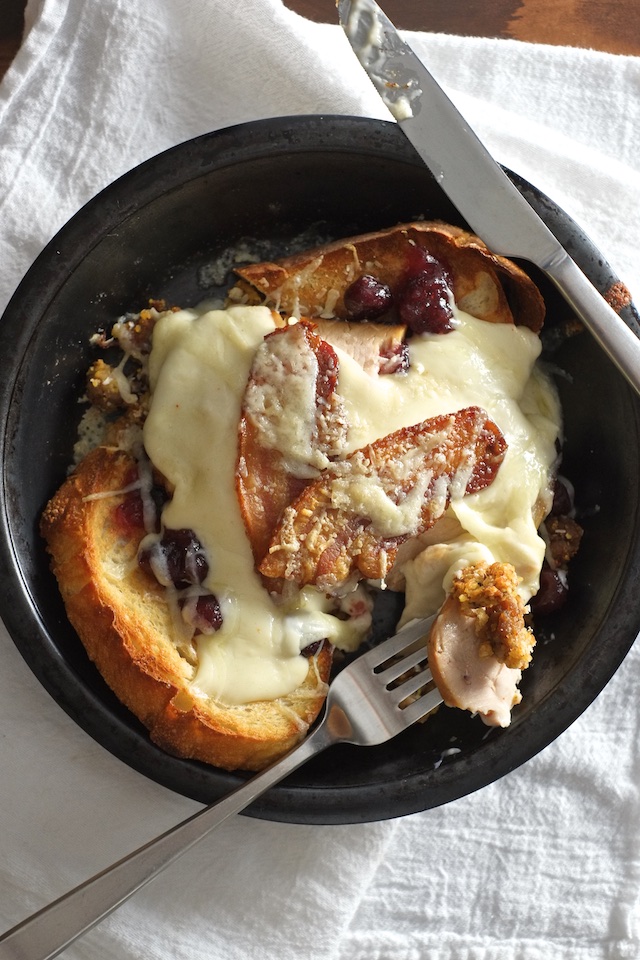
I hear that Kentucky has this crazy sandwich called a Hot Brown. I can’t say I’ve ever had a proper one, but it’s an open-faced thing with toast on the bottom, turkey, tomatoes, cheese sauce, and bacon. So I didn’t really need to go to Kentucky to know it’s for me.

This Thanksgiving version is built similarly on a bed of toast and stuffing, a layer of sliced turkey, cranberry sauce instead of tomatoes, a blanket of gruyere cheese sauce, and bacon. It works. But to be honest, anything with a blanket of gruyere cheese sauce is going to taste good. If you’re up for making a little bechamel and bacon the day after, Thanksgiving Hot Browns could be in your future.

Ingredients:
-white bread
-leftover stuffing
-leftover turkey
-leftover cranberry sauce
-bacon
-one recipe bechamél sauce with a cup of shredded gruyere cheese to melt into every cup of sauce (plus a small handful of shredded gruyere set aside for topping)
-salt and pepper (I like white pepper for white sauces, but black is delicious)
-optional: pinch of nutmeg (for the cheese sauce)

Method:
1. Start your bacon. Cook it in the oven using this method because it’s the best.
2. Make your bechamél sauce using this method. Remove it from the heat and stir in your shredded gruyere until melted and smooth. Season sauce with salt and pepper to taste. Add a pinch of nutmeg if you’re using it.
3. Toast up your bread and slice it in halves or quarters. Place it in an oven safe dish like a pie pan. Warm up your stuffing and turkey and add a pile of each to the toasted bread (stuffing on the bottom, turkey on top).
4. Dot the toast, stuffing, and turkey with cranberry sauce.
5. Flood the entire mess with as much cheese sauce as you like. Top with a few strips of crispy cooked bacon and a sprinkle of shredded gruyere.
6. Broil the sandwich until the cheese on top is melted and bubbly. Set the pie pan on a plate or towel (because it will be hot) and eat it with a fork and knife.


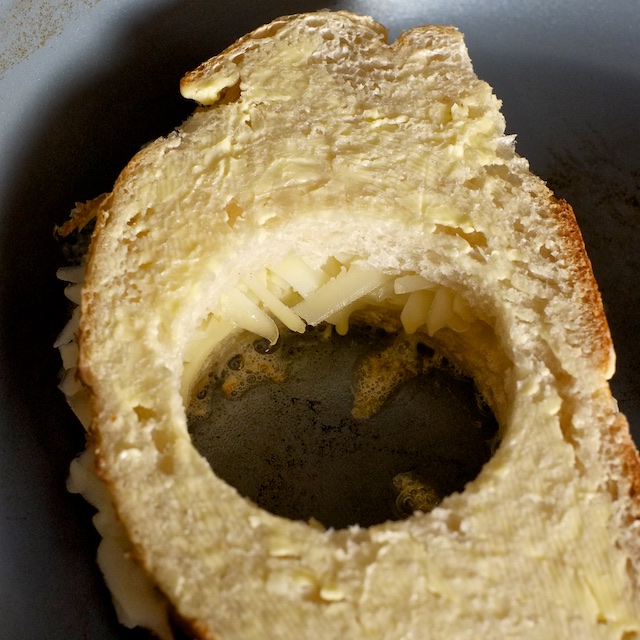
#4: The Turkey, Brie, Bacon, and Cranberry Grilled Cheese

Brie and Bacon: Thanksgiving Sandwich Showdown

Brie and sweet cranberries are just made for each other. Add a little bacon to balance out the sweetness, nestle some turkey in the middle and it’s pretty excellent. This sandwich was my favorite texture-wise because the crunch of properly butter drenched and slowly toasted bread is undeniable.

Ingredients:
– a fancy white loaf of bread (with some good air holes in that crumb structure for enhanced textural awesomeness)
-butter (like a tablespoon per sandwich)
-brie (maybe three slices per side of the sandwich, more is good too, less is fine if you’re not sure how you feel about brie)
-leftover turkey
-leftover cranberry sauce
-bacon

Method:
1. Make bacon like this.
2. Slice your bread about 1/2 inch thick. Butter one side of each slice (the sides that will be the outside of the sandwich)
3. Assemble your sandwich with three slices of brie on each slice of bread, turkey on one side, cranberry on the other side, and bacon in the middle.
4. Toast your sandwich in a pan (buttered sides out) over low to medium-low heat until the cheese is melty, the sandwich is warmed through, and the bread is gorgeously brown.
5. Eat it while it’s hot.

Thanksgiving Sandwich Showdown

All these sandwiches are delicious and I love them like children, but last night I combined the filling from the croissant sandwich with the buttery toasted bread from the grilled cheese and we are getting married.

Who’s your favorite??

  1. These look fantastic. Trying these left over sandwiches will be the payoff this year. Thanks for sharing!

    Lisa — November 25, 2015
    1. I hope you like them Lisa!

      courtney — December 6, 2015
    2. reply
  2. You win Thanksgiving.

    Tiffany Rueckert — November 25, 2015
    1. Thanks to you, Tiffany!

      courtney — December 6, 2015
    2. reply
  3. […] Thanksgiving Sandwich […]

    25 Ways to Eat Thanksgiving Leftovers - A Dash of Sanity — October 25, 2016
    1. reply
  4. […] Sweet Salty Tart – Thanksgiving Sandwich Showdown […]

    Ideas for Thanksgiving Leftovers | My Crazy Good Life — October 27, 2016
    1. reply
  5. I am making our leftover Thanksgiving sandwiches this year using Jalepeno Cheese bread, turkey, dressing, cranberry sauce and gravy. I can't decide If I love Thanksgiving dinner or the leftovers best.

    Becky — November 23, 2016
    1. reply
  6. Stuck at work today, dreaming of the turkey sandwich I'll have tonight. Straightforward turkey, stuffing, cranberry sauce and mayo on rye with Utz potato chips on the side. Almost better than the day-of feast.

    kim — November 25, 2016
    1. reply
cancel reply

The Best Brownies

The Best Brownies

I am not exactly the queen of desserts. I think I have four recipes for sweets on this site. And they’re all on the very basic end of the dessert spectrum. I don’t normally go for sweets at all, but when I do, I keep it simple.

Lately my cooking habits have changed. If you follow me on Instagram, you heard already, but I’m pregnant! Aaaand my relationship with food has become complicated. Thankfully, I’m through the worst of the nausea, but for weeks I hated the smell of food being cooked and if there was even a trace of any aroma left after I was done eating, the windows had to be opened, candles had to be lit, and scented sprays had to be spritzed. We ate a lot of fast food.

And I’ve been craving desserts like I’ve never craved anything in my life. I don’t know how many of you have ever been pregnant, but the violence of a pregnancy craving (or aversion) is unreal. If someone suggests a food to me, or if someone in a show I’m watching happens to be eating something, I either need it so bad right now that I’m actually drooling or I want it burned out of existence before the thought of it makes me vomit. I have not been able to even look at broccoli, for example, but chocolate makes me dizzy with want (and burgers and pizza and crispy chickens of all kinds).

The Best Brownies

So, I made brownies. Fudgy ones. With real chocolate.

The best trick I have for fudgy brownies is to underbake them ever so slightly, so when you check these for doneness, look for slight wobble but not slosh, and for a knife or stick that comes out from the center of the brownies almost clean, but with a few sticky chocolate crumbs holding on.


The Best Brownies

Ingredients:
-3/4 cup unsweetened chocolate, chopped
-3/4 cup butter (thats one and a half sticks), cubed
-2 cups white sugar
-4 large eggs
-2 tsp vanilla
-1 1/4 cups all purpose flour
-1/2 tsp. salt
-3/4 tsp. baking powder

Method:
1. Preheat your oven to 325F. Heat a small pot of water over medium heat until it simmers. Set a glass or metal bowl on top of the simmering water (the bottom of the bowl should not touch the top of the water). Use a bowl that is large enough to hold the entire batch of batter (a standard 2.5 qt mixing bowl will do the trick).

2. Into the mixing bowl over the simmering water (btw this is called a double boiler) add your chopped chocolate and cubed butter. Stir the chocolate and butter until completely melted.

3. Remove the mixing bowl from the pot of water and let it cool slightly. Stir in sugar and test the temperature with your finger. When the chocolate and sugar are no warmer than body temp, you can add the vanilla and start adding your eggs and mixing them in one at a time.

4. When the eggs are stirred into the chocolate and sugar mixture, mix together the flour, salt, and baking powder in a smaller, separate bowl. Add the dry ingredients to the wet ingredients in two or three additions, folding to combine.

5. Pour your finished batter into a buttered, parchment or foil lined 9×13 baking pan. Bake for 35-45 minutes or until a knife or toothpick inserted in the center of the brownies comes out with a few sticky crumbs attached. Allow to cool, slice (this part will be messy if you’ve done it right) and serve.

  1. I think my taste buds were permanently changed by pregnancy. I predict more sweets on your blog! But seriously, could you make me some of those brownies?

    Carrie — November 18, 2015
    1. reply
cancel reply

Baked Potato Cheddar Soup With Leeks and Garlic

Baked Potato Cheddar Soup With Leeks and Garlic

Have you ever invited friends for dinner and had them request soup? Friends of mine who have been fed this soup, if they don’t outright ask for it when they come over, will silently hope that I make it for them (I know because they tell me how happy they are when they see a big pot of it on the stove). For dinner. They want soup.

I discovered a version of this soup when I was working at my favorite kitchen job in a breakfast and lunch cafe in Salt Lake City. This soup was our Friday soup, and it always sold out because it is garlic cheese velvet.

It’s hearty stuff, being made of potatoes and cheese, so I serve it with a big salad and a bit of toast and nobody ever complains.

It adds some time to the process, but don’t skip the potato-baking step. Potatoes that have been baked have a hugely different flavor than potatoes that are boiled or microwaved, and it screws up the soup if you leave it out, so take the time and bake them and you will be richly rewarded. If you can salvage the skins, cut them in fat strips, swipe them with butter, sprinkle with salt and pepper and cheese and bake them in a 400 degree oven for 20 minutes for a nice crispy potato skin topping or side nibble (maybe even in lieu of toast).


Baked Potato Cheddar Soup With Leeks and Garlic

Ingredients:

4-5 medium russet potatoes
2 Tbsp butter
2-3 medium sized leeks, sliced and rinsed of grit
3-4 medium cloves garlic, minced
4-6 cups chicken broth
1 cup sour cream
1 6 oz brick sharp cheddar cheese, grated
salt and pepper to taste
sliced green onion for garnish

Method:

1. Preheat your oven to 400F, scrub your potatoes and pierce the skin once or twice with a knife. Bake them straight on the rack for about an hour, or until a knife inserted in the side goes in and comes out with almost no sticking or resistance.

2. While the potatoes bake, prep your leeks by trimming the roots and dark green parts away (dark green parts are fibrous and not so edible). I like to rinse mine by cutting them in half lengthwise, slicing them pretty thin, and putting them in a large bowl of water. Use your fingers to separate the layers in the bowl of water and give the dirt and grit time to sink to the bottom of the bowl. Drain the leeks by lifting them out of the bowl with a strainer or your hands, leaving the dirt and water in the bowl.

3. In a large pot, heat butter over medium heat and cook the leeks until soft. Add the garlic and cook until fragrant. Before the garlic takes on any color, add 4 cups of chicken broth and bring to a simmer.

4. When the potatoes are cooked and cool enough to handle, cut them in half length-wise and scoop out the flesh. Add the baked potato flesh (ew, is there a better word for that?) to the pot with the leeks and broth.

5. Blend the potatoes and broth/leek mixture with an immersion blender until completely smooth. The texture might be pretty thick at this point, but you can thin it later (in step 7) with more broth (that’s what the extra two cups are for).

6. Scoop out about a cup of the blended potato soup and transfer it to a mixing bowl. Add the sour cream to the bowl and whisk together until smooth. Add the sour cream mixture back to the soup and incorporate fully.

7. Remove the soup from heat and whisk in the cheese, a handful at a time, until it’s fully melted and smooth. This is the best point to adjust the thickness of the soup to your liking by adding more broth if necessary.

8. Season the soup to taste with salt and pepper and serve topped with sliced green onion.

cancel reply

Fall Favorites

Fall Favorites

It’s snack time! I am way into my snacks lately and my sense of curiosity compels me to try new snack options as often as possible, so I present to you my latest greatest and most delicious favorite snacks. Fall edition.

Sweetango Apples: These apples are sweet and crisp, yet cheaper and more snack-sized than honeycrisp, and with a tiny bit more tang. I don’t usually go for apples at all, but I saw these at Trader Joes, claiming to be the tart cousin of honeycrisp, and they turned out to be pretty great. Especially when paired with…

Old Amsterdam Aged Gouda (the pale orangey one): Aged gouda is my favorite cheese of all time. It’s sharp but smooth, nutty and almost caramel-y. Sliced thin it pairs perfectly with my Sweetangos. I found Old Amsterdam at Trader Joe’s, but I have found comparable aged goudas at lots of other stores. Aged gouda. Like old, aged (I’m talking 18 months minimum). Go get some.

Cabot Farmer’s Legacy Collection Alpine Cheddar: The little ribbon on the corner of the package says “nutty and smooth with hints of swiss and parmesan!” and it’s not lying. I like my cheeses nutty apparently. This one doesn’t pair quite as well with Sweetango apples as Old Amsterdam (not that it’s bad), but it’s even more perfect on crackers. It tastes expensive and it’s about three dollars a brick. Found at Wegmans, but Cabot has a pretty wide national presence, so your local megamart probably has it.

Good Earth Sweet & Spicy Herbal Tea: This tea is soo spicy! And it tastes a little bit sweet even without sweetener. It’s very cinnamon-y with orange and ginger and it’s perfect for fall. I ordered mine on Amazon.

Fall Favorites

Daelmans Caramel Bites: These are the mini stroopwafels that Trader Joe’s carries. What is a stroopwafel? WELL I’ll tell you: it’s a thin waffle cookie sandwich with caramel in the middle. The flavor is pretty mild, sweet but not cloying, and the texture is crispy and chewy in the most addictive way. They beg to be dunked in your afternoon tea or coffee.

Sonoma Creamery Mr. Cheese O’s: I’m a cheese fiend, apparently. But these are practically healthy. They are made with straight up real cheese and quinoa flour which is then baked into pretty little lacy, crispy O’s. If you’ve ever had cheese crisps, these taste like those. They are also only 140 calories per bag, so I don’t bother holding back. I’ve seen these at Target, but then loved them so much I ordered a CASE on Amazon. One of the better decisions of my life.

Trader Joe’s Dark Chocolate Peanut Butter Cups: Peanut butter cups are amazing, but dark chocolate peanut butter cups are somehow more adulty and acceptable for women of my age. Plus I prefer the taste. Trader Joe’s chocolate choices are usually pretty respectable, and this one tastes good enough to eat on it’s own. The peanut butter is amazing though, and makes these treats rather filling. I can eat two and be satisfied (for at least a few minutes).

What snacks are you chomping lately? Tell me everything!

  1. I'm going to have to try some of those! I've been snacking on potato chips, choco tacos, and other healthy things lately. Trying to turn over a new leaf though.

    miranda — October 29, 2015
    1. Where do you get choco tacos??

      courtney — December 6, 2015
    2. reply
  2. apples and cheese (and soppressata) is my JAM. also apples and cookie butter. i went through almost a whole jar this week. i have no shame.

    hannah — October 29, 2015
    1. I still have not done apples with cookie butter and I don't know what's wrong with me.

      courtney — December 6, 2015
    2. reply
cancel reply

End of Summer Vegetable Soup With Pesto

End of Summer Vegetable Soup With Pesto

Raise your hand if you still have a pile of zucchini to use up on this second day of what is now officially fall. And how about perfectly juicy summer tomatoes? My farmers market is still pumping out summer produce by the box, so I’ve still got it on my mind.

And since I’ve also got tubs of pesto waiting to be used in my freezer, I put two and two together and the end result did not suck. This soup is fresh and bright and satisfying and perfect for the first slightly cool days of fall.

End of Summer Vegetable Soup With Pesto

If you didn’t go to the trouble of making your own pesto, you should maybe consider it? But if it’s just not happening, at least go to a store that makes their own in house, and ask if you can sample it before you buy (or if you have a brand you already know and love, use that). Pesto is a huge player in this soup so it has to be on point.

I served my soup with a cheese and charcuterie board and some toasted baguettes. Nobody was mad about it.

End of Summer Vegetable Soup With Pesto

End of Summer vegetable Soup With Pesto
makes 6-8 servings

Ingredients:

-1 Tbsp olive oil or butter
-2-3 leeks, chopped and washed of grit
-2 cloves garlic, minced or grated
-2-3 zucchini, diced
-2 yellow tomatoes, diced
-1-2 ears fresh corn, or about 1/2 a small bag of frozen corn
-6 cups chicken broth (it’s extra tasty and you get brownie points if you use homemade broth)
-2 cups fresh spinach (frozen will also work, but won’t be as pretty)
-2-3 tsp lemon juice or white wine vinegar
-salt and white pepper, to taste (black pepper is also fine)
-1/4 cup pesto, stirred into the soup, plus more for topping (probably 1/2-3/4 cup total, depending on how many you are feeding)
-optional: parmesan cheese for topping

Method:

1. Start by cooking your leeks over medium heat in your fat of choice in a large soup pot. When the leeks are wilted, add garlic and stir for a minute.

2. When the garlic is fragrant, add diced zucchini and cook until the zucchini is soft.

3. Add diced tomatoes, corn, and chicken broth and bring the soup to a boil. Add spinach and allow it to wilt into the soup. Add salt, pepper, and lemon or vinegar. Taste and adjust seasoning as necessary. The soup will get an added hit of flavor from the pesto, but it should be able to stand on its own seasoning-wise. Summer vegetables tend to be watery too, so you may need to add more salt than you think (depending on the saltiness of the broth you use). Taste, taste, taste.

4. Remove the soup from the heat and stir in 1/4 cup of pesto, taste again and adjust seasoning if necessary.

5. Serve soup with a dollop of pesto on top and a shave or two of parmesan cheese. And definitely some toasty bread on the side.

6. This soup freezes well so, if you didn’t finish your batch, stash the rest in some freezer-safe containers and store them in the freezer for up to 3 months. Defrost in the fridge (this will take at least a day) and re-heat gently on the stovetop or in the microwave, stopping and stirring after every minute or so. Future you will appreciate the effort.

cancel reply

Batch Fest: Pesto

pesto

It’s time to make pesto. A lot of pesto.

I haven’t personally ventured into the canning, jam-making homestead-y realm of cooking (YET!), but I have been known to freeze summer’s most precious produce for later consumption. No special equipment is needed for batch freezing apart from plastic containers and freezer space, and I can save my favorites long enough to get to revisit them during that dark night of the soul known as winter after the holidays. I realize that basil can be bought year-round in most of America these days, but it’s not the same to me. And don’t even get me started on store bought pesto (dull. sham. flames. on the side of my face.).

Though to be fair I didn’t know anything about really good pesto until I got a kitchen job where I had to make it all the time. Once I had the real thing, I was ruined for everything else, and now I can’t live without the stuff. Proper stuff. With piles of fresh cheese and garlic and toasted nuts and basil that is properly blanched (for prettiness, ease of blending, and I swear it changes the flavor). Nothing compares.

If you’ve had good pesto without blanched basil it might be hard for me to convince you that blanching is important. Maybe we could debate it. But don’t knock it until you’ve tried it. I really think it’s worth the extra trouble. I say I will be freezing my pesto so I can revisit it in winter, but if I’m honest, it will most likely be gone by November because I put it in and on everything.

Like eggs. D you know how good pesto on toast is with a runny fried egg on top (or folded into soft scrambled fluffiness)? Look into it.

pesto

Big Batch of Pesto
(makes about 4 cups pesto per cup of blanched basil)

Ingredients:
-as much basil as you can get your hands on
-about 3/4 cup toasted pine nuts, almonds, walnuts, or whatever mix of those that you like for each cup of basil (after blanching)
-about 3-4 cloves garlic per cup of blanched basil
-about 1 1/2 cups parmesan, finely grated, per cup of blanched basil
-about 1 cup pecorino romano, finely grated, per cup of blanched basil
-about 1 cup olive oil per cup of blanched basil
-salt, to taste

Method:

1. Start by blanching your basil, since all your other measurements depend on how much the basil shrinks after it’s blanched and squeezed. While picking the basil leaves from the stems, set a medium pot of water over high heat and wait for it to boil. When the water boils, turn the heat to medium-high. After your basil is picked, get a bowl of ice water ready and set it next to the stove. Drop bunches of basil into the hot water until they are just wilted and use a slotted spoon to transfer the wilted basil into the ice water. You will likely have to work in batches because raw basil is very voluminous, but it goes quickly.

2. When all the basil is blanched and cooled in the ice water, remove the basil to a clean tea towel and wring it out over the sink. Separate your basil into one-cup portions.

3. Place a cup of blanched basil in the bowl of a food processor along with the toasted nuts and garlic, and pulse to finely chop the ingredients.

4. Scrape down the sides of the food processor and add the grated parmesan and pecorino cheese.

5. Turn on the food processor and let it run while you slowly pour in your olive oil. Scrape down the bowl and pulse to re-mix as necessary.

6. Taste the pesto, add salt until it is as savory as you like. Add olive oil if the pesto is too thick and more cheese or nuts if it is too thin.

7. Portion the pesto into freezable, airtight containers, mark them with the date they were made, and stash them for later use. You can store them in the freezer for up to 6 months and defrost them in the fridge when you want to eat them. Possibly atop a slice of toast and beneath an over-easy egg.

  1. […] you didn’t go to the trouble of making your own pesto, you should maybe consider it? But if it’s just not happening, at least go to a store that […]

    End of Summer Vegetable Soup With Pesto | Sweet Salty Tart — September 22, 2015
    1. reply
  2. […] Homemade pesto – I use my one-cup tubs. […]

    Freezing Fundamentals for Foodies | Sweet Salty Tart — February 19, 2016
    1. reply
cancel reply

Jalapeño Avocado Slaw

Jalepeno Avocado Slaw

It probably doesn’t feel like it, but we officially have a month of summer left, and many of us have more than a month of grilling weather left to maximize. I don’t know about you guys but I love slaw with grilled stuff, and this one is particularly excellent. Not too sweet, a little spicy, and a tiny bit rich – not from an overly creamy dressing, but from honking chunks of creamy avocado.

I’m a fan of diced cabbage rather than shredded cabbage in marinated salads like this. Slaws taste best when they have a few hours to mingle and let the flavors develop, but shredded cabbage tends to get limp and sad as it soaks in the salty dressing. Dicing the cabbage eliminates the soggy slaw visual so you can give the salad all the time it needs to properly get together. You can add the avocado at the last minute if you like, but the dressing contains quite a bit of lime and vinegar which will keep it from turning brown too quickly. I kind of love the green on green going on in that bowl, it’s pretty in a highly-edible, unfussy way.

Jalepeno Avocado Slaw

Jalapeño Avocado Slaw

Ingredients:
-1 Tbsp white wine vinegar (or cider vinegar)
-juice of 1/2 lime
-1/3 cup mayo
-1 1/2 Tbsp honey
-dash cumin
-1 small clove garlic, grated or minced
-2 jalapeños, seeded, quartered lengthwise, and thinly sliced
-1/4 cup green onion, sliced
-2-3 Tbsp cilantro, minced (less is fine if you’re sensitive to that flavor)
-1 small head cabbage (about 6 cups diced)
-1-2 avocados, cut into large chunks
-salt and black pepper, to taste

Method:

1. In the bottom of a large mixing bowl, combine vinegar, lime juice, mayo, honey, cumin, and garlic. Whisk together, add salt, and taste. This dressing is on the thin side, which I think makes the whole thing feel fresher. Adjust sweetness, tartness, and saltiness by adding more honey, lime, or salt as you like.

2. Dice cabbage, slice jalapeño and green onion, and mince cilantro. Add to your mixing bowl and toss to coat in dressing. Taste again for seasoning and adjust as you like. Add avocado chunks now (and re-toss to coat the avocado in dressing) if you will be serving within an hour.

3. Allow salad to rest, covered and refrigerated, for at least half an hour and up to 4 or 5 hours (but wait to add avocado if you’re making the salad that far in advance). Serve chilled.

cancel reply